Player Controllers
This is the character type that is controller by the player controls via keyboard, mouse, gamepad, or touch. There are several ways in which the Actor (character) and the Camera can be controlled. plyGame has a few build-in options but there might also be plugins that provide further options. Always read the documentation for the option you’ve selected and make sure to not add components that might conflict. For example, you should not have both the 3rd person and top-down player controllers on a player character object.
You might also be interested in the Player Manager page.
Some character controllers might also require a character animation controller be added while other might have this animation control build in. Refer to the relevant section to learn if the character needs additional components to function properly.
You will note that the player has mouse and button selection related options. The selection system also ties into a system that can automatically display a marker on the selected character (or object). This can be set up in the Markers Editor.
Interact System
The player can interact with other characters and objects. What can be interacted with will depend on the object type but generally include NPCs, Interact Objects, and Items. The settings, in player controllers, that allows you to specify what and how objects are selected also determine what can be interacted with. When interaction is started the character will be set in a controlled state which will prevent movement except if you specify otherwise in the player controller settings, where supported. Interaction can be force stopped through the Interaction related Blocks. There are also Event related to interaction, which can be found under plyGame > Actor and plyGame > Object.
Action Slots
The player controllers have a property named, Action Slot Count (set it to 0 to disable this action slots). This can be changed to the number of action slots available on the character. Action Slots are used to “equip” Skills and Items. With Items this would normally be Items that has the use-from-bag option like Health Potions. Action Slots starts at (0) for the first slot, then (1) for the second, (2) for the 3rd, and so on.
Action Slots 0 to 9 uses the Input Binds, Action1, Action2, etc by default. You can use Blocks to change what Input Binds are used. You can also trigger an action via Blocks, for example when a button in your user interface was pressed that represents an action slot. Note that the default binds are initialised during the player’s Start Event, so do not add your own binds during the Start Event but rather use the State Enter Event.
There are various Blocks under Character > Action Slots to interact with the Actions Slots.
Top-Down
The top-down controller provides a player controller where you can use either the keyboard to move the character or mouse click/ hold to move it. The recommended camera gives a view-point similar to what you find top-down RPG games like Diablo or Torchlight. The following video will give you an idea of how this controller works.
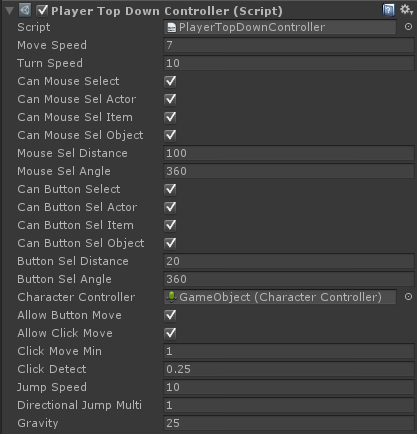
To create a character with this controller, select the character object and then from the Component menu, select: plyGame > Character > Player > Top-Down Controller. This will add the Actor, Character Controller, and Top-Down Controller to the object.
Additional Components
- The recommended camera is the Top-Down Camera when using the Top-Down Player Controller.
- One of the Character Animation Controllers should be added else the character will not animate wile idle or moving.
Settings
- move Speed: How fast the character moves.
- turn Speed: How fast the character turns.
- can Mouse Select: Can the player use the mouse to select targets?
- can MouseSel Actor: Can the player target Actors (like NPCs)?
- can MouseSel Item: Can the player target Items?
- can MouseSel Object: Can the player target Objects?
- mouseSel Distance: How far from the player character can a selection be made (meter)?
- mouseSel Angle: At what angle around the player character can a selection be made (degrees)? You will normally want to set this to 360 for a top-down view and something around 60 for a 3rd or 1st person type controller.
- clearSelectedOnFloorClick: Clear selected when clicking on floor? Same input define as one used to make selection.
- can Button Select: Can the player use a button to select a target? The default key-bind is “Tab”.
- can ButtonSel Actor: Can the player target Actors (like NPCs)?
- can ButtonSel Item: Can the player target Items?
- can ButtonSel Object: Can the player target Objects?
- buttonSel Distance: How far from the player character can a selection be made (meter)?
- buttonSel Angle: At what angle around the player character can a selection be made (degrees)? You will normally want to set this to 360 for a top-down view and something around 60 for a 3rd or 1st person type controller.
- max Interact Distance: Max distance this character can be from something to interact with it. This value should be smaller than the selection ranges.
- Valid Interact Target: Select the kind of targetables that the player can “interact” with (trigger the Interact Event on). By default this is when the player right-click on or use the E key near an interactable.
- auto-Move to Interact: Should character automatically move closer to target to interact with?
- movementCanStopInteraction: If set then interaction stop events will be triggered if the player was interacting with something and started moving.
- item Select Interact: Does selection of an Item trigger interaction. Player will move closer, if possible, to interact/ pickup the item.
- character Controller: The Unity Character Controller should be automatically detected.
- allow Button Move: Can the player move this character with buttons, like keyboard and game-pad?
- allow Click Move: Can the player move this character with mouse click/ held?
- allow Click Hold Move: Can the player move this character with mouse button held down? (no effect if ‘allow Click Move’ not enabled)
- click Move Min: How far from the character should player click to initiate movement (meter)?
- click Detect: Timeout used to detect a “click”. This is to detect if the mouse button is held down or if the player intended to click (press down and let go).
- Always Face Mouse: Will cause the character to always face in the direction of the mouse pointer. This option is best used with keyboard-only for movement, turning off “Allow Click Move” and “Allow Click Hold Move”.
- jump Speed: Determines the jump power or hight that can be reached. Note that gravity also play a role in hight that can be reached.
- gravity: Gravity determine how fast the character moves down after jumping or when falling.
- Click marker Fab: A prefab to instantiate and use as the marker that is used when showing where the player clicked (to move). The marker object is enabled when the user clicks on the floor/ terrain and it is up to your object to disable itself when it is ready to disappear (The plyGame Misc Components can help with this).
Top-Down NAV
The top-down nav controller provides a player controller where you can use the mouse click/ hold to move the character. The Unity NavAgent is used to move the character so it will navigate around on the baked navmesh. The recommended camera gives a view-point similar to what you find top-down RPG games like Diablo or Torchlight.
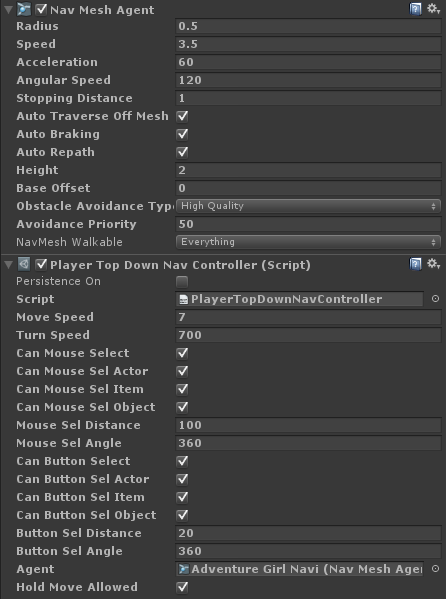
To create a character with this controller, select the character object and then from the Component menu, select: plyGame > Character > Player > Top-Down Nav Controller. This will add the Actor, NavMeshAgent, and Top-Down Nav Controller to the object.
Additional Components
- The recommended camera is the Top-Down Camera when using the Top-Down NAV Player Controller.
- One of the Character Animation Controllers should be added else the character will not animate wile idle or moving.
- You should add a collider to the object and set it to “trigger”. Projectiles, for example, needs this to be able to detect the character else they will fly right through the character.
You might want to place the Nav Mesh Obstacle component onto any NPC character that does not make use of the Pro Move controller or another controller that uses a NavMesh Agent component to function.
Settings
- move Speed: How fast the character moves.
- turn Speed: How fast the character turns. (This value should be quite high, at around 700 to notice turning, when using NavMehsAgent)
- can Mouse Select: Can the player use the mouse to select targets?
- can MouseSel Actor: Can the player target Actors (like NPCs)?
- can MouseSel Item: Can the player target Items?
- can MouseSel Object: Can the player target Objects?
- mouseSel Distance: How far from the player character can a selection be made (meter)?
- mouseSel Angle: At what angle around the player character can a selection be made (degrees)? You will normally want to set this to 360 for a top-down view and something around 60 for a 3rd or 1st person type controller.
- clearSelectedOnFloorClick: Clear selected when clicking on floor? Same input define as one used to make selection.
- can Button Select: Can the player use a button to select a target? The default key-bind is “Tab”.
- can ButtonSel Actor: Can the player target Actors (like NPCs)?
- can ButtonSel Item: Can the player target Items?
- can ButtonSel Object: Can the player target Objects?
- buttonSel Distance: How far from the player character can a selection be made (meter)?
- buttonSel Angle: At what angle around the player character can a selection be made (degrees)? You will normally want to set this to 360 for a top-down view and something around 60 for a 3rd or 1st person type controller.
- max Interact Distance: Max distance this character can be from something to interact with it. This value should be smaller than the selection ranges.
- Valid Interact Target: Select the kind of targetables that the player can “interact” with (trigger the Interact Event on). By default this is when the player right-click on or use the E key near an interactable.
- auto-Move to Interact: Should character automatically move closer to target to interact with?
- movementCanStopInteraction: If set then interaction stop events will be triggered if the player was interacting with something and started moving.
- item Select Interact: Does selection of an Item trigger interaction. Player will move closer, if possible, to interact/ pickup the item.
- agent: The Unity NavMeshAgent should be automatically detected.
- holdMove Allowed: Will allow the player to hold the mouse button down to move the character. If disable then only click-to-move is used.
- Click marker Fab: A prefab to instantiate and use as the marker that is used when showing where the player clicked (to move). The marker object is enabled when the user clicks on the floor/ terrain and it is up to your object to disable itself when it is ready to disappear (The plyGame Misc Components can help with this).

3rd Person
The 3rd Person controller provide a controller similar to what you find in popular online games like WoW, Rift and FFXIV. The player uses the keyboard or game-pad to move the character and the mouse or game-pad to turn the character. The recommended 3rd person camera allows the player to zoom, tilt and rotate the camera freely around the character. Have a look at the following video to see how this controller works.
To create a character with this controller, select the character object and then from the Component menu, select: plyGame > Character > Player > Third Person Controller. This will add the Actor, Character Controller, and Third Person Controller to the object.
Additional Components
- The recommended camera is the Third Person Camera when using the Third Person Player Controller.
- One of the Character Animation Controllers should be added else the character will not animate wile idle or moving.
Settings
- move Speed: How fast the character moves.
- turn Speed: How fast the character turns.
- can Mouse Select: Can the player use the mouse to select targets?
- can MouseSel Actor: Can the player target Actors (like NPCs)?
- can MouseSel Item: Can the player target Items?
- can MouseSel Object: Can the player target Objects?
- mouseSel Distance: How far from the player character can a selection be made (meter)?
- mouseSel Angle: At what angle around the player character can a selection be made (degrees)? You will normally want to set this to 360 for a top-down view and something around 60 for a 3rd or 1st person type controller.
- clearSelectedOnFloorClick: Clear selected when clicking on floor? Same input define as one used to make selection.
- can Button Select: Can the player use a button to select a target? The default key-bind is “Tab”.
- can ButtonSel Actor: Can the player target Actors (like NPCs)?
- can ButtonSel Item: Can the player target Items?
- can ButtonSel Object: Can the player target Objects?
- buttonSel Distance: How far from the player character can a selection be made (meter)?
- buttonSel Angle: At what angle around the player character can a selection be made (degrees)? You will normally want to set this to 360 for a top-down view and something around 60 for a 3rd or 1st person type controller.
- max Interact Distance: Max distance this character can be from something to interact with it. This value should be smaller than the selection ranges.
- Valid Interact Target: Select the kind of targetables that the player can “interact” with (trigger the Interact Event on). By default this is when the player right-click on or use the E key near an interactable.
- auto-Move to Interact: Not supported in this player controller.
- movementCanStopInteraction: If set then interaction stop events will be triggered if the player was interacting with something and started moving.
- item Select Interact: Does selection of an Item trigger interaction. Player will move closer, if possible, to interact/ pickup the item.
- character Controller: The Unity Character Controller should be automatically detected.
- move Back Multi: A multiple of the normal movement speed. A value below 1 will be slower while one above 1 will be faster.
- jump Speed: Determines the jump power or hight that can be reached. Note that gravity also play a role in hight that can be reached.
- mouse Turn Speed: How fast the character can be turned with the mouse.
- gamepad Turn Speed: How fast the character can be turned with a game-pad.
- gravity: Gravity determine how fast the character moves down after jumping or when falling.
- require Cursor Lock: Turn this off if the camera should be controllable even without cursor lock. Cursor lock is when the mouse cursor is hidden and stuck to the center of the screen.
- control Cursor Lock: Turn this on if you want mouse lock controlled by this controller. The mouse will be locked and unlocked as needed.