NPC Controllers
NPCs (Non-Player Characters) are used to represent the various characters in the game-world that are not controlled by the Player.
An NPC has several components to give it the needed behavior.
- The NPC Controller can be seen as its brain (AI) and determines what it will do and how it will act. The Actor component will be automatically added.
- The Movement/ Navigation Controller will help it move around. You should use only one of the navigation controllers.
- and the Animation Controllers is used to control walk, run, and idle type animations on it.
Collider
You will have to place a collider on the character, depending on which systems you make use of. Player selection/ targeting of an NPC (via mouse, keyboard or gamepad) will require a collider. The Skills system also require a collider as it uses ray casts to find targets to apply effects on, same with any projectile created by skills. The collider should be created such that it envelopes the NPC but it does not have to be too precise. You can set the collider to be a trigger if you wish, or have to, since it should not matter for most systems.
NPC Controller
This is the basic AI of an NPC and is used to make decisions, like where to move next and actions to perform. This controller does not animate the character so you need to add one of the animation controllers too.
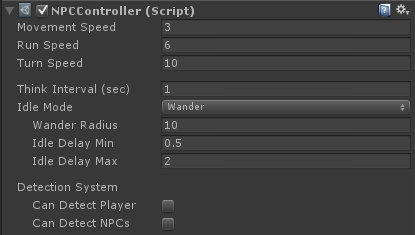
The controller can be added to an object by selecting the character and then choosing from the component menu: plyGame > Character > NPC > NPC Controller.
- Movement Speed: How fast the character should be moving when moving (or max speed it can reach)
- Run Speed: Is used by the NPC when it wants to gets closer to something faster. This is normally the case when it wants to use a Skill on something it has targeted.
- Turn Speed: How fast the character can turn when turning (or max turn speed). (This value should be quite high, at around 700 to notice turning, when using NavMehsAgent based movement controller - Pro Move)
- Think Interval: This determines when the AI will ‘Think’. You want to set this to be at least higher than around 0.3 and definitely not 0.0 as you do not normally want the AI to think on every frame. It will also determine when the
On AI ThinkEvent of the NPC is triggered. - Idle Mode: Choose what the NPC does while it is in an ‘idle’ state. This is when it is not chasing or attacking something.
- Stay: The NPC will stay in place.
- Wander: The NPC will wander around its spawn/ instantiated position.
- wander Radius: The size of the area it will wander in.
- Delay-Min and Delay-Max: is how long it will wait before it choses a new point to move to in the wander area.
- Patrol: The NPC will follow a designated path.
- path: The way-point path it should follow.
- Follow: Set this to have the NPC follow another object, for example another Character. This could be used to create a follower for for the player.
- target: Is the object to follow.
- min distance: Helps that the character to not get too close to the object it is following or move out of the way of the object.
- max distance: Is how far from the object the character can be before running closer to it.
Detection System
The NPC has a way to detect and ‘engage’ other characters (Player and other NPCs). To ‘engage’ means the NPC makes another character a selected target. The On Detect Characters Event is triggered when the NPC detected one or more characters. The Event is triggered in the Blox on the Character and child objects of the Character object.
The detection system simply detects and optionally select characters. It is up to you to react to this via plyBlox. You should not enable settings that are not needed as it will increase performance when the NPC does not have to do unnecessary checks. So think carefully about which of the settings you change below and why you do it.
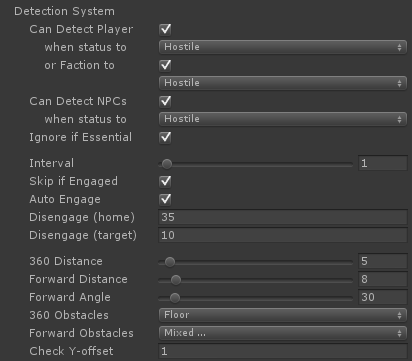
- Can Detect Player: set this if the NPC should be able to detect the Player. You normally want to enable this for monsters so they can detect the player but it might be unnecessary to enable this for a Shop Keeper NPC who has no reason to know about the player being nearby until the player engages the NPC.
- when status to: only detect if the NPC’s Status (as set in Actor) is this or higher towards the Player. Status works in such a way that Friendly is the lowest, followed by Neutral, and finally Hostile. Example: if you set this to Neutral and the NPC is Hostile then the NPC will ‘detect’ the player since it is in a status higher than you set here. However, if the NPC was friendly, then it would not detect the player since its status is lower than what you set here (Neutral).
- or Faction to: enable this if you want the NPC to also check the Status of its Faction(s) towards that of the Player.
- Can Detect NPCs: enable this so that the NPC can detect other NPCs. Again, only do this if really necessary. It would be unnecessary to enable this if the monsters in your game will never attack each other but you would have to enable this if you wanted the monsters to be able to also attack an NPC following the Player, for example his pet.
- when status to: determines if the NPC will detect the NPCs around it or not by checking the status of its factions towards the factions of the target NPC is in.
Ignore if Essential: will cause the NPC to not detect any Actor that has the ‘Is Essential’ option set. Useful when you want to keep monsters from selecting and possibly attacking quest givers and other essential NPCs who would not die anyway. Note, death is dependent on how other parts are set up too ad could still be possible even with essential flag set.
Interval: is a timer (in seconds) that determine at what rate the NPC runs it detection algorithm. Just like with Think Interval you do not want to set this too low and possibly never have it near 0.0.
- Skip if Engaged: can be set so that the NPC do not constantly switch between selected targets (engaged targets). If it already has a target it will simply stick to it and not select another. This will cause the
On Detect CharacterEvent to not run if the NPC already has a target from previous detection. Auto Engage: can be used to let the NPC auto select the closest character it detected. If you do not set this then you will have to use a Block, in for example the
On Detect CharacterEvent, to set the selected/ engaged target or else Skills that depends on something being selected will not execute. It all depends on your needs and what you are using the detection system for.Engaged Min Distance: Set this to the minimum distance the NPC can be from its engaged target. NPC will move away when too close to the target. You should set this lower or even 0 if you find the NPC runs away from target too often, just to return to execute the Skill. The value should be lower than the Skill’s execution range.
Engaged Max Distance: NPC will move closer to target if further than this to target and while not executing a skill. These two options are useful to control the range the NPC will stay from the target. For ranged only NPCs you might want to keep them further away from the target while melee-attack only NPCs will want to stay closer.
Disengage: Is used to control when the NPC will automatically clear its selected target.
- Home: Set this to how far the NPC can move from its ‘home’ position. The Home position depends on what the NPC’s Idle Mode is. For ‘Stay’ and ‘Wander’ this is where the NPC was spawned/ instantiated. For ‘Patrol’ this is the position of the last point it was moving to on the path, and for ‘Follow’ this is the position of the object being followed.
- Target: This works in combination with ‘Home’ to determine when the NPC will break off from ts selected target. It will normally not break off if it is within this distance or closer to the selected target. An exception if when the NPC’s idle mode is set to ‘Follow’ - in this case it will always break off when too far from the object being followed, even if still in range of its selected target.
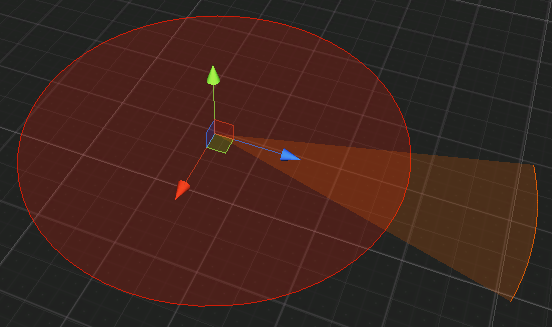
- 360 Distance: is the radius of the detection circle around the NPC (red in the image). Anything that comes into this circle will be detected. You can think of this as the hearing of the NPC.
- Forward Distance: is the distance in the NPC’s forward direction at which it can detect (orange in the image). This can be thought of as the NPC’s vision (eyes). You normally want to set this to be at least more than the 360 Distance. Setting this to be the same or less than 360 Distance will effectively disable this option - useful when 360 detection is enough for your needs and improves performance.
- Forward Angle: works together with Forward Distance to determine the range at which the NPC can do detection in front of it.
- 360 Obstacle: is used to determine what is considered to hide character that comes within range of detection.
- Forward Obstacles: is used to determine what is considered to hide a character from detection, even if it comes within the forward detection range.
- Check Y-offset: is used by the 360 and Forward Obstacle checks and is the height a ray is cast from the NPC to the possibly detected target.
plyBlox
The NPC adds various Events and Blocks to plyBlox. The Events can be found under plyGame > NPC while the Blocks will be in various Groups but most will be found under Character.
Navigation
NPCs need a controller to navigate the scene and move the character. There are a few options and the one you choose will depend on the scenario it is used in. You should have only one of these controllers on an NPC. These controllers can be found on the component menu: plyGame > Characters > NPC > Movement.
No-Move
Use this when the NPC will never have to move around. For example a quest giver NPC that always stand in the same spot or a shop keeper that will never move from behind the counter.
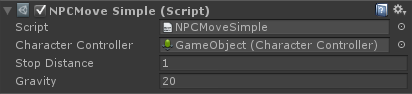
Simple Move
This is a very basic movement option and will move the NPC in a straight line to its destination. It will not try to avoid obstacles and can get stuck. Still a useful option where you know the NPC will not get stuck like when it will only ever follow a predefined path (like a waypoint path).
- character Controller: The controller of the NPC.
- stop Distance: How soon it can stop. How far from the asked destination point.
- gravity: Used when character is falling or when controller is trying to keep the character to the floor/ terrain.
- Can Turn: Turn this off to prevent an NPC from turning. Will cause problems if move is on since the NPC would not be able to turn in movement direction.
- Can Move: Turn this off to prevent NPC from moving while it might still be able to turn to face its target.
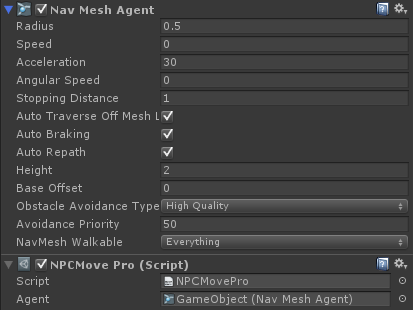
Pro Move
The Pro movement makes use of Unity’s navmesh based navigation system. This is the movement option you want to choose when you want your NPCs to intelligently navigate around the scene.
You might want to place the Nav Mesh Obstacle component onto the player character so that it and NPCs will interact correctly while moving. This would not needed if your chosen player controller makes use of the Unity navigation system and the player character has its own NavMesh Agent component.
When adding this component a ‘NavMesh Agent’ will also be added. Please have a look at the Unity documentation to learn how to create and bake a navmesh and what the options in the NavMesh Agent means. You might to set Stopping Distance lower or even 0 if you find NPC is struggling to get in range to use a Skill on a character.