Camera Controllers
Camera Controllers are used to control the main camera in the game. There are several options and configuration differ between them. Some cameras work better with certain Player Controllers and you will get best results when using the recommended Player and Camera controllers together. Some player controllers might have camera control build right into it so you need to make sure to not add components that might conflict with each other. The documentation will clearly state what requirements there are and when one controller wants or prefer another be used with it.
Top-Down
It is recommended that you use this camera with the Top-Down Player Controller. The camera gives a view-point similar to what you find top-down RPG games like Diablo or Torchlight. The following video will give you an idea of how this camera works.
The controller should be added to your Player Character object and not the camera object in the scene. Note, you should have a camera object (MainCamera) in your game scenes. Select the player character object and then from the component menu, select: plyGame > Camera > Top-Down Camera.
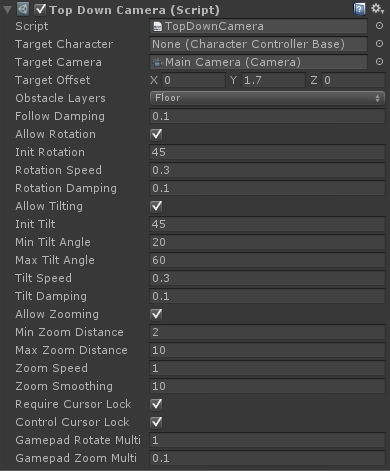
- target Character: The character to follow and look at (normally the player character object). You may leave this field empty as the player can be automatically detected.
- target Camera: The camera object. You may leave this field empty as the camera tagged, “MainCamera”, can be automatically picked in such cases.
- target Offset: Target Offset to look at from target object’s pivot. You normally want to adjust the y field so that the camera look at the player’s head.
- obstacle Layers: Which layers should count as obstructing the view and is ground? The target object’s collider(s) should not be in any of these layers.
- follow Damping: How fast the camera catches up with the target’s position changes.
- allow Rotation: Is rotation allowed or should camera stick the the initial angle only?
- init Angle: Initial angle around target.
- limitedRotAngle: 0 = not used, else the player can only rotate the camera in this limited angle from the “init angle”.
- rotation Speed: Rotation speed.
- rotation Damping: Used to smooth out the rotation.
- allow Tilting: Is tilting of camera allowed or should camera stick the the initial angle only?
- init Tilt: Initial tilted angle.
- min Tilt: Minimum tilt (how far down camera can go to look up to the character)
- max Tilt: Maximum tilt (how far camera can go up ti look down on character)
- tilt Speed: Tilt speed.
- tilt Damping: Used to smooth out the tilting.
- allow Zooming: Is zooming allowed?
- min Zoom Distance: How close to target the cam can come.
- max Zoom Distance: How far out from the target the cam can be zoomed.
- zoom Speed: How fast zooming happens.
- zoom Smoothing: How smooth/ fast camera zooming responds.
- back Distance: how far back from the character the cam should be in relation to “zoom”.
- require CursorLock: Turn this off if the camera should be controllable even without cursor lock.
- control CursorLock: Turn this off if you want mouse lock controlled elsewhere (for example via a key bind that show or hide the mouse cursor)
- gamepad Rotate Multi: Multiplier applied to rotation and tilt speed when using gamepad.
- gamepad Zoom Multi: Multiplier applied to zoom speed when using gamepad.
3rd Person
It is recommended that you use this camera with the 3rd Person Player Controller. The camera gives a view-point similar to what you find in online games like WoW, Rift and FFXIV. The player can zoom, tilt and rotate the camera freely around the character. The following video will give you an idea of how this camera works.
The controller should be added to your Player Character object and not the camera object in the scene. Note, you should have a camera object (MainCamera) in your game scenes. Select the player character object and then from the component menu, select: plyGame > Camera > Third Person Camera.
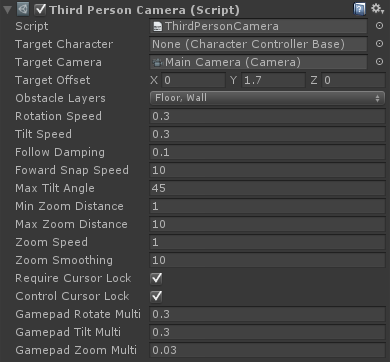
- target Character: The character to follow and look at (normally the player character object). You may leave this field empty as the player can be automatically detected.
- target Camera: The camera object. You may leave this field empty as the camera tagged, “MainCamera”, can be automatically picked in such cases.
- targetOffset: Target Offset to look at from target object’s pivot.
- obstacleLayers: Which layers should count as obstructing the view and is ground? The target object’s collider(s) should not be in any of these layers.
- rotation Speed: Horizontal rotation speed.
- tilt Speed: Vertical rotation speed.
- follow Damping: How fast the camera catches up with the target’s position changes.
- forward Snap Speed: How fast the camera snap to target object’s forward vector when target moves.
- max Tilt Angle: When the cam is tilted down and becomes grounded it will move towards the target and start looking up from the ground. This determine that max up angle.
- min Zoom Distance: How close to target the camera can come.
- max Zoom Distance: How far out from the target the camera can be zoomed.
- zoom Speed: How fast zooming happens.
- zoom Smoothing: Used to smooth out the in/ out movement.
- require Cursor Lock: Turn this off if the camera should be controllable even without cursor lock.
- control Cursor Lock: Turn this off if you want mouse lock controlled elsewhere (for example via a key bind that show or hide the mouse cursor)
- gamepad Rotate Multi: Multiplier applied to rotation speed when using gamepad.
- gamepad Tilt Multi: Multiplier applied to tilt speed when using gamepad.
- gamepad Zoom Multi: Multiplier applied to zoom speed when using gamepad.