Make RPG: Settings Screen
 The settings screen will be created with the plyGame Screens System but it could be done with other solutions like Unity’s new GUI system or NGUI. The information in this guide should help you get started with creating an area where the player can change some game options. This guide builds on the previous one of the Make RPG series and you should have read the previous one first.
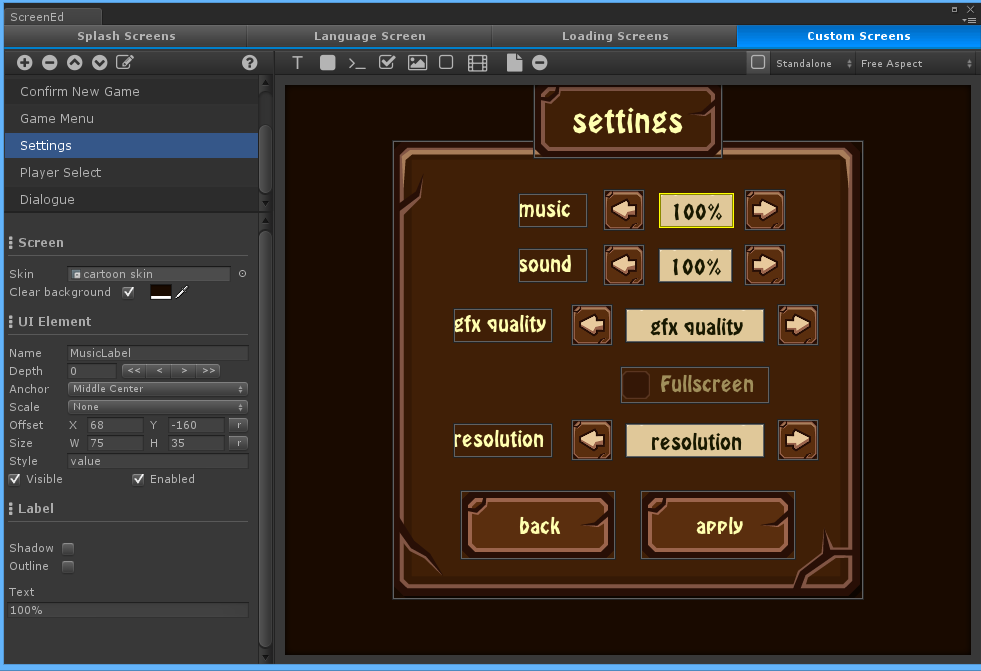
The screen will make use of buttons to change various options sine buttons can be linked to trigger Events and Blocks then used to apply the change.
From top to bottom I named the GUI elements as follow. It is especially important to name the labels as I will need to access them in Blocks to change the values on them. The buttons will use default names but here I call specific Events and put certain values in param1.
For each of the volume buttons I set param1 = -5 for the left-hand button (meaning, decrease volume by 5) and param1 = 5 for the right-hand button. You wil lse ein the Blocks how I use this param1 value to subtract or add to the volume.
- music volume level:
MusicLabel - music buttons: trigger Event
MusicVolume - sound volume level:
SoundLabel - sound buttons: trigger Event
SoundVolume
For graphics quality I set param1 = 1 (left) and param1 = 2 (right). The label is named QualityLabel.
The fugllscreen toggle is named FullscreenToggle and will trigger Event Toggle Fullscreen when it changes. Note that a toggle will set param2 to either on or off to indicate what the state of the toggle is after it was changed (clicked).
The resolution label is named ResLabel and its buttons will trigger Event Change Res when clicked, with param1 = 1 (left) and param1 = 2 (right). When these buttons are used the resolution selection will change without the actual resolution being applied. The apply button must be used to apply the selected resolution.
The back button will trigger Event Save Settings and the apply button will trigger Event Apply Resolution.
All Events related to the Settings Screen will of course be created in the Screens System’s Blox. You can access this via the edit button next to where you enter the name of an Event to trigger in the button element’s properties, or open it with the edit button in the inspector of Assets/plyData/Sustem/ongui prefab.
Showing the Settings Screen
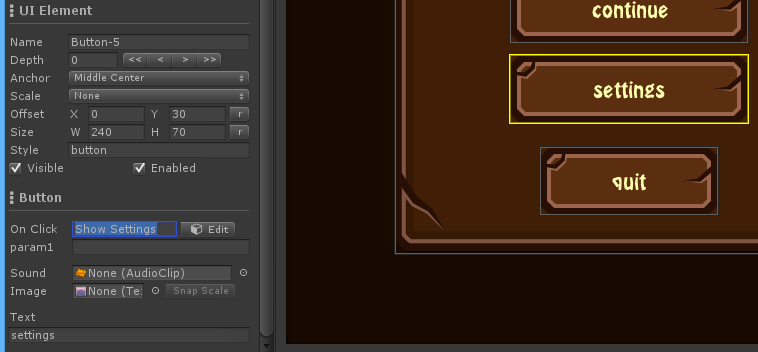 On the main menu is a button that will trigger the
 Show Settings Event. This event will initialise the labels of the settings screen and then show it. There is not much else to explain, have a look at the used Blocks and read their descriptions in the Block’s help panel to learn more about what it does.
[@E:Common > Custom:: Show Settings@]
[@B:GUI > Screens (plyGame) > Set Text:: Set Text of [H:Set Text ofMusicLabel:H][V:Set Text ofMusicLabel:V] on [H:onSettings:H][V:onSettings:V] to [@B:Common > String > String: A + B:: String [@B:Audio > Sound (plyGame) > Get Volume:: Volume of [H:Volume ofMusic:H][V:Volume ofMusic:V] @] + [@B:Common > Values > String:: [H:Value%:H][V:Value%:V] @] @] @]
[@B:GUI > Screens (plyGame) > Set Text:: Set Text of [H:Set Text ofSoundLabel:H][V:Set Text ofSoundLabel:V] on [H:onSettings:H][V:onSettings:V] to [@B:Common > String > String: A + B:: String [@B:Audio > Sound (plyGame) > Get Volume:: Volume of [H:Volume ofGeneral:H][V:Volume ofGeneral:V] @] + [@B:Common > Values > String:: [H:Value%:H][V:Value%:V] @] @] @]
[@B:GUI > Screens (plyGame) > Set Text:: Set Text of [H:Set Text ofQualityLabel:H][V:Set Text ofQualityLabel:V] on [H:onSettings:H][V:onSettings:V] to [@B:Render > GFX Quality > Quality Level Name:: Name ofQuality Level [@B:Render > GFX Quality > Current Quality Level:: Current Quality Level@] @] @]
[@B:GUI > Screens (plyGame) > Set Text:: Set Text of [H:Set Text ofResLabel:H][V:Set Text ofResLabel:V] on [H:onSettings:H][V:onSettings:V] to [@B:Render > Screen (plyGame) > Selected Resolution:: Selected Resolution@] @]
[@B:GUI > Screens (plyGame) > Set Toggle State:: Set Toggle [H:Set ToggleFullscreenToggle:H][V:Set ToggleFullscreenToggle:V] on [H:onSettings:H][V:onSettings:V] to [@B:Render > Screen > is Fullscreen:: is Fullscreen@] @]
[@B:GUI > Screens (plyGame) > Show Custom Screen:: Show Screen: [H:Show Screen:Settings:H][V:Show Screen:Settings:V] [H:AdditiveFalse:H]@]
Sound Volume Settings
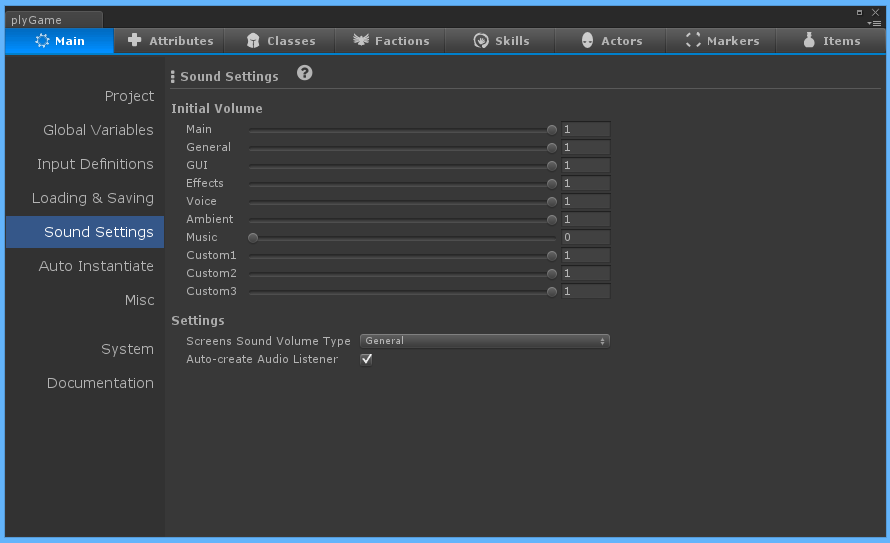 The plyGame sound volume manager is used. The initial values can be set up in the plyGame Main Editor under
 Main > Sound Settings.
Some common sound types are defined here but there are 3 additional types that can be made use of. You can also choose which of the sound types the GUI sound volume should using. You’ve probably noticed that a Screens Button Element for example has a field where you could specify a sound clip to play when the button is clicked. The volume of this clip’s playback is determined by the volume of the type set in Screen Sound Volume Type. In my game I will make it the same as the general volume type since I allow the player to only control the volume of Music and everything else falls under General.
plyGame can auto-create an audio-listener and there are also Blocks to control this listener under Audio > Sound (plyGame). I suggest you leave this on by default so that plyGame can create the audio listener that would be needed to play music in the menu and for GUI sound effects. You can anyway control this listener and tell it to for example follow the player when a game scene is loaded, for 3D sound effects.
Be sure to remove the Audio Listener component from the Camera object in any new scene you create. Unity adds it by default but you are not allowed to have more than one active listener at the same time so if you do not remove this listener from the camera you will see error messages in the console.
When the music buttons are clicked the MusicVolume event is triggered with param1 set to -5 or 5. The event will simply take the value in param1 as an Integer and apply to the volume to decrease (-5) or increase it (5).
[@E:Common > Custom:: MusicVolume@]
[@B:Audio > Sound (plyGame) > Change Volume:: Change volume of [H:ofMusic:H][V:ofMusic:V] by [@B:Variables > Temp Variables > Get Temp Int:: [H:Getparam1:H][V:Getparam1:V] as Integer @] @]
[@B:GUI > Screens (plyGame) > Set Text:: Set Text of [H:Set Text ofMusicLabel:H][V:Set Text ofMusicLabel:V] on [H:onSettings:H][V:onSettings:V] to [@B:Common > String > String: A + B:: String [@B:Audio > Sound (plyGame) > Get Volume:: Volume of [H:Volume ofMusic:H][V:Volume ofMusic:V] @] + [@B:Common > Values > String:: [H:Value%:H][V:Value%:V] @] @] @]
The sound volume event works the same as the music volume.
[@E:Common > Custom:: SoundVolume@]
[@B:Audio > Sound (plyGame) > Change Volume:: Change volume of [H:ofGeneral:H][V:ofGeneral:V] by [@B:Variables > Temp Variables > Get Temp Int:: [H:Getparam1:H][V:Getparam1:V] as Integer @] @]
[@B:GUI > Screens (plyGame) > Set Text:: Set Text of [H:Set Text ofSoundLabel:H][V:Set Text ofSoundLabel:V] on [H:onSettings:H][V:onSettings:V] to [@B:Common > String > String: A + B:: String [@B:Audio > Sound (plyGame) > Get Volume:: Volume of [H:Volume ofGeneral:H][V:Volume ofGeneral:V] @] + [@B:Common > Values > String:: [H:Value%:H][V:Value%:V] @] @] @]
Change Graphics Quality
 Graphic quality is represented by various levels of quality. These levels are configured in Unity’s Quality Settings. This can be accessed from menu:
 Edit > Project Settings > Quality. Have a look at the Unity documentation to learn more about this.
The graphics quality buttons trigger the Event Change GfxQuality with param1 set to either 1 or 2 to indicate that the quality should be decreased or increased.
[@E:Common > Custom:: Change GfxQuality@]
[@C:Flow > Condition > If:: If [@B:Flow > Comparison > String: a = b:: [@B:Variables > Temp Variables > Get Temp String:: [H:Getparam1:H][V:Getparam1:V] as String @] = [@B:Common > Values > String:: [H:Value1:H][V:Value1:V] @] @] @]
    [@B:Render > GFX Quality > Change Quality:: [H:DoDecrease:H][V:DoDecrease:V] GFX Quality @]
[@C:Flow > Condition > Else:: Else @]
    [@B:Render > GFX Quality > Change Quality:: [H:DoIncrease:H][V:DoIncrease:V] GFX Quality @]
[@C:  end  @]
[@B:GUI > Screens (plyGame) > Set Text:: Set Text of [H:Set Text ofQualityLabel:H][V:Set Text ofQualityLabel:V] on [H:onSettings:H][V:onSettings:V] to [@B:Render > GFX Quality > Quality Level Name:: Name ofQuality Level [@B:Render > GFX Quality > Current Quality Level:: Current Quality Level@] @] @]
Set Resolution
When the fullscreen toggle is clicked the game resolution will be changed to either be fullscreen or in window mode. You can obviously not test this in the unity editor and will have to create a stand-alone build to test it properly. The toggle will trigger the event Toggle Fullscreen.
I could check if param2 is on or off but I’ll simply change the current mode of the screen, change it to the other mode. It is faster, less blocks, than having o do an IF ELSE.
Finally a call must be made to inform the Screens System that the resolution has changed, this is done via the Inform Screens Of Resolution Change Block. If you do not do this then the element sizes and positions will look wrong after the resolution was changed.
[@E:Common > Custom:: Toggle Fullscreen@]
[@B:Render > Screen > Set Mode:: Set Fullscreen [@B:Flow > Comparison > NOT a:: Not [@B:Render > Screen > is Fullscreen:: is Fullscreen@] @] @]
[@B:GUI > Screens (plyGame) > Screen Resolution Changed:: Inform Screens Of Resolution Change @]
The resolution buttons will trigger the event Change Res with param1 set to either 1 or 2. This will allow the player to move between resolutions without actually applying it yet. The player will have to click on apply to apply the selected resolution. It is done this way as it could be quite annoying for the player if he had to wait for a resolution to be applied each time he click the button to get to the one he wants.
[@E:Common > Custom:: Change Res@]
[@C:Flow > Condition > If:: If [@B:Flow > Comparison > String: a = b:: [@B:Variables > Temp Variables > Get Temp String:: [H:Getparam1:H][V:Getparam1:V] as String @] = [@B:Common > Values > String:: [H:Value1:H][V:Value1:V] @] @] @]
    [@B:Render > Screen (plyGame) > Change Resolution:: [H:DoDecrease:H][V:DoDecrease:V] Resolution @]
[@C:Flow > Condition > Else:: Else @]
    [@B:Render > Screen (plyGame) > Change Resolution:: [H:DoIncrease:H][V:DoIncrease:V] Resolution @]
[@C:  end  @]
[@B:GUI > Screens (plyGame) > Set Text:: Set Text of [H:Set Text ofResLabel:H][V:Set Text ofResLabel:V] on [H:onSettings:H][V:onSettings:V] to [@B:Render > Screen (plyGame) > Selected Resolution:: Selected Resolution@] @]
The apply button will trigger the Apply Resolution Event to apply the selected resolution. Again, you can’t test this in the Unity editor (in play mode) as it will show wrong information and can’t change the resolution when in the editor.
[@E:Common > Custom:: Apply Resolution@]
[@B:Render > Screen (plyGame) > Apply Resolution:: Apply Resolution @]
[@B:GUI > Screens (plyGame) > Screen Resolution Changed:: Inform Screens Of Resolution Change @]
Save Settings
The back button is used to save the settings via the Save Settings Event and then return to the main menu screen. plyGame will automatically restore the selected settings the next time the game is started.
[@E:Common > Custom:: Save Settings@]
[@B:Audio > Sound (plyGame) > Save Volume Changes:: Save Volume Changes @]
[@B:Render > Screen (plyGame) > Save GFX Settings:: Save GFX Settings @]
[@B:GUI > Screens (plyGame) > Show Custom Screen:: Show Screen: [H:Show Screen:Main Menu:H][V:Show Screen:Main Menu:V] [H:AdditiveFalse:H]@]