plyBlox
plyBlox (also referred to as simply Blox) is a visual scripting tool for the Unity game engine. You can add behavior to objects via a drag and drop interface, behavior which would normally have to be written in scripts using a language like UnityScipt or C#.
A plyBlox object can have one or more States, each containing one or more Events that can be triggered which in turn contain the Blocks that are executed when the Event is triggered. A Block is what does all the work in plyBlox and you connect one or more of them together in an Event.
Settings
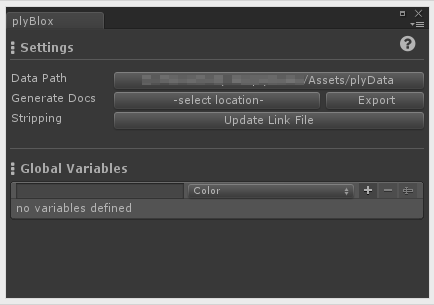 The plyBlox Settings can be opened from the menu:
 Tools > PLYoung > plyBlox > Settings.
The Data Path button allows you to choose in which folder the plyBlox data is stored. By default it will be in Assets\plyData\. You need to first create the folder in the Unity Project panel before you choose it via this button. It is best if you can leave it to the defaults.
The Generate Docs option can output the build-in Events and Blocks documentation to the specified location and save it in files in a markdown format.
The Stripping option is important when you are building for mobile devices and uses the Unity stripping options in your project settings. It will generate the link.xml file that is needed to tell Unity which classes to not remove.
Finally you will see an area where you can define variables. These are the Global Variables of plyBlox. Variables are discussed later on this page. You enter a name, choose a type and then hit the [+] button to add a variable. You can change the value of the variable after it is added.
Creating a Blox
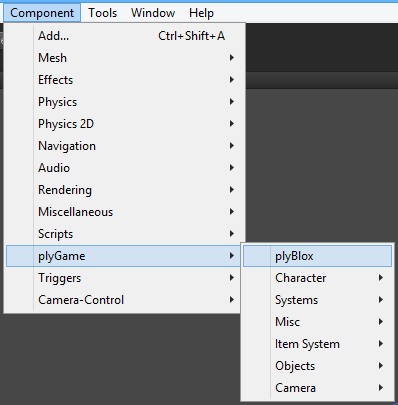 With a GameObject (or prefab) selected, you can add a Blox to it from the menu:
 Component > plyGame > plyBlox. Sometime another system will automatically place a Blox component on an object that needs it. This is especially true when working with plyGame, DiaQ, or one of my other tools that integrates with plyBlox.
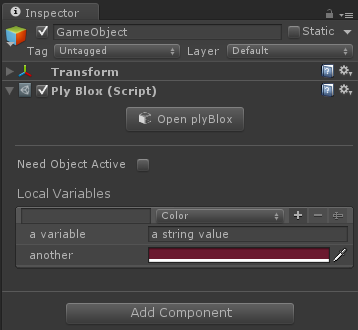 In the Blox Component’s Inspector you will see a button to Open plyBlox. This will open the Blox editor where you setup the states and events and add blocks to the events.
Need Object Active is normally set by the plyBlox component when it need to hint, to whatever other code is listening, that the GameObject should not be made inactive. This is normally when there are events that needs to respond on each frame of the game, like Update and OnGUI or collision related events. You can also set this option if there is a need for it.
Lastly you will see the Local Variables of the plyBlox. Variables are discussed later on this page, but this is where you can define Local Variables associated with this specific plyBlox component. You simply enter a name, choose the type and them press the [+] button to add a variable. You can change the value of the variable after it is added.
Variables
Variables are objects that holds values which can then be read or changed by Blocks. The values can be strings (normal text), numbers (like integer and float), vectors, colours, and even prefabs, GameObject, Textures and other Unity object types.
 There are 4 types of variables in plyBlox.
 Global Variables are as the name say, global and there exist one set of these kind of variables. They can defined on the plyBlox Settings panel.
 Local Variables are unique to each plyBlox component. You can think of them as the variables associated to the GameObject/ Prefab that the Blox is on. They can be created in the Inspector of the relevant plyBlox component.
 Temp Variables are unique to each Event in a plyBlox component and is only valid inside the Event they where created in or inside the Event that created and provided them.
 metaData is a special kind of variable which is not associated with the whole plyBlox component but to some specific object that can be accessed via Blocks. The DiaQ system for example use this with its graphs, nodes and quests. There is one plyBlox object serving the whole DiaQ object so local variables would not work so well to identify data unique to each quest or node or even quest rewards and conditions. This is where metaData works best. They can be accessed in the same way as the other variables via the provided Blocks.
Besides creating global and local variables in the editor you can also use Blocks to create them and/ or temporary variables and metaData entries. The Blocks related to the variables can be found in the Variables blocks group. Each type can be identified by the little icon in the Block.
 The Dark or Blue (P) icon in front of a Local or GLobal variable definition indicates whether that variable will be included when encoding the variable data. Encoding is normally done when the variables should be saved. The Blue icon means the variable persist (will be included in encoding of variable data).
Blox Editor
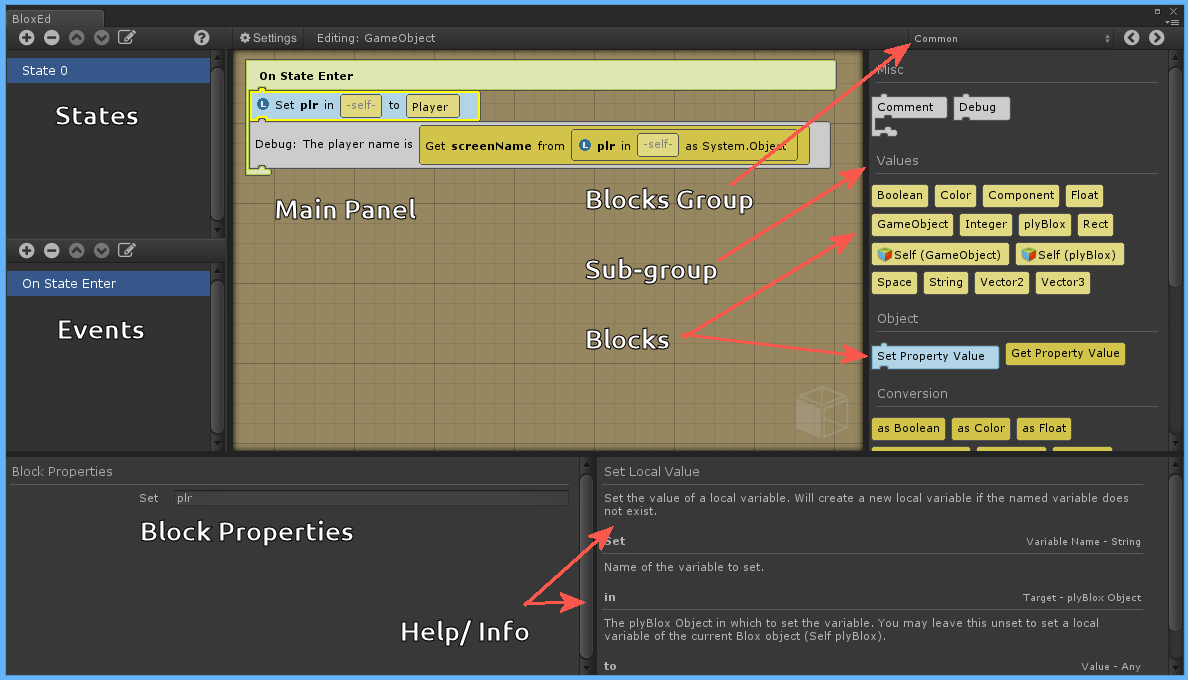 The plyBlox editor can be opened by either pressing the Edit button in the Inspector of the selected object (that has a plyBlox Component on it) or by opening it from the menu:
 Tools > PLYoung > plyBlox > Editor.
It is divided into several sections. To the right you create the States and Events. In the center you will edit the selected Event, by adding Blocks. To the left will be a list of Blocks you can use. The bottom-right panel will show additional properties of the selected Event or Block if it has any and the bottom-left panel shows the build-in help/ documentation of the selected Block or Event.
States
The first thing you need to do is define a State. There are normally only one state needed but plyBlox support the concept of more than one State if you need it for a unique situation. To create a state you simply use the (+) button in the States toolbar. You will also note that there are buttons to delete, move, and rename the selected state.
At runtime there can only be one State active at a time. The first state in the list will be the active one until changed. Only the events of the active state will run. So if you have more than one state then the other states will be idle and their events will not respond to any triggers.
Events
With a state created you will now have the option to add Events to the State. To add a new event simply use the (+) button to see a list of the events available and choose the one you want to add. Events respond to certain things happening and the kind of Event you use will depend on what it is you want the Blox to respond on.
The Common > On State Enter event for example will trigger once and that is when the state the event is in, is activated (or entered). So for the first state that would be as soon as the GameObject that the Blox component is on, is activated in the scene. The Common > n Update event responds to the Unity Update which happens each frame of the game, so this is a good place to add things that should happen continuously.
There is also one special Event which is not bound to any build-in trigger/ response but is normally triggered by yourself or systems that you choose to trigger it from. This is the Common > Custom event. You will normally want to rename this event and give it a unique name. There is a Block Flow > Trigger Event which you can use from another event to trigger the a custom event.
In the bottom-left panel you will notice the Event properties. active can be set or cleared to enable or disable the event. A disabled event will not execute at run-time. This is a quick way to prevent the event from being available at run-time without having to delete it in case you need the event for later. The event colour will also change to indicate that it is disabled.
Blocks
With an Event selected you will see the Blocks become available. You will also see the Event in the main editor area. The bottom panels will show any properties/ options this event might have and its build-in help/ info.
The Blocks are what does the work inside an Event. You can add Blocks to the Event by clicking on the one you wish to use (in the Blocks panel) and then moving it to the location in the Event where you want to insert it. Blocks are grouped and you can change the group from the drop-down above the Block list panel.
Click on a Block to pick it up and then move the mouse towards the Event inside the main editor area. If it is a valid Block you should see a snap-in marker become visible. The easiest way to test this would be to pick the Debug block now and then move your mouse towards the spot where it seems it will snap in. The marker should appear and if you click now you should see the block being placed. Play around with adding blocks in this way.
Some blocks can only be snapped to specific locations. For example, the Flow > Else block can only be added to the bottom of the Flow > If or Flow > Else If blocks and other blocks can only be placed inside die field areas of blocks.
You will note that the newly inserted Block becomes “selected” as indicated by the yellow frame around it. To unselect a Block you can simply press the Esc key. The properties and help panels will change depending on what Event or Block is selected. Placed Blocks can be selected by clicking on them.
In the bottom-left panel you will notice the Block properties. active can be set or cleared to enable or disable the block. A disabled block will not execute at run-time. This is a quick way to prevent the block from being available at run-time without having to delete it in case you need the block for later. The block colour will also change to indicate that it is disabled.
When an Event is executed (at runtime) it will start from the top and run through the Blocks one after the other. Some Blocks might cause a loop or branching to occur or even stop execution immediately. These special kind of blocks will normally be in the Flow group.
Shortcuts
- Delete can be used to delete the selected block
- Ctr+X is used to cut the selected block
- Ctr+C is used to copy the selected block
- Ctr+V is used to paste a cut/ copied block
You can also right click on in the main editor area to see a context menu with these options.
Block Types
There are different types of Blocks and the type will determine how it is used.
Action
 These blocks are normally Blue but can be other colours. The Debug block for example is gray but is also an Action type block. Action blocks perform something specific and then exit so that the next block can run. They follow one after each other in the Event or in a Container Block. These blocks might require insertion of Value or Condition Blocks as ‘fields’ (more on this later).
Container
 These blocks are normally Green but can be other colours. The Comment block for example is gray and the GUI Button block is pink. These blocks are similar to Action Blocks and follow on each other within the Event or another Container Block. They can also contain Value or Condition Blocks as fields and perform some kind of action. The main reason for using them however is to contain other blocks as child blocks. The container can choose to execute these child blocks or not. The
 FLow > If block for example will only execute the contained (child) blocks if the condition/ test turns out to be True while the Common > Comment block will always execute its child blocks and the GUI > OnGUI > Button block will only execute its child blocks when the button, drawn on the screen at runtime, is clicked.
Value
 Value blocks are normally yellow or dark yellow. They can only be used as fields in other blocks but might also accept other Value or Condition blocks as fields. The dark yellow variation normally require that you insert other blocks as fields before they will function.
Condition
 These blocks are basically the same as the Value blocks but is normally pink in colour and expected to return a Boolean (True/ False) value. They are normally used as fields on the Flow related Blocks and perform conditional checks.
Block Fields
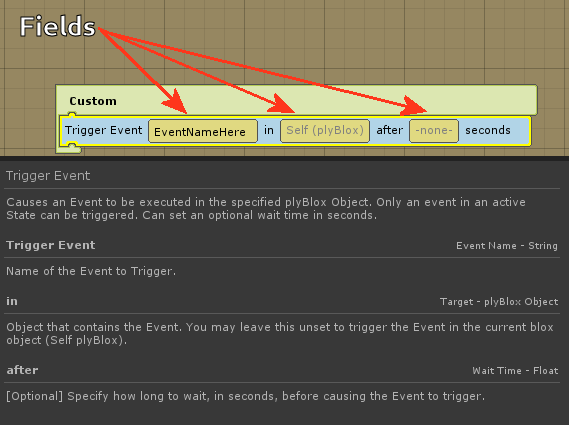 When referring to Blocks Fields we are talking about the spaces on a block into which you add Value (or Condition) blocks. You will notice that Action and Container type blocks can’t be placed into these spaces. Also keep in mind that fields do not accept just any value blocks but only those that comply to the field type. A field expecting a block that returns a Boolean value will for example not accept one that returns a String value. Have a look at the description/ info panel in the bottom-right to see what type the block field(s) accepts.
The Trigger Event block for example has three fields. The first one takes a string value, the second is a plyBlox and already defaults to the Blox object that this Block is being called in, and the 3rd is a float value.
In this case you could insert the Common > Values > String block in the 1st field to edit the name. For the 2nd field you could leave the value at its default if the event that this block triggers is in the same plyBlox, or you could add a Variable or other block that carries the information of the target plyBlox. You will note that the 3rd field is optional and default to a value of 0 but here you could insert the Common > Values > Float block, or perhaps one of the Variables > ..as float Blocks.
Advanced
Custom Blocks
Your own Blocks can be added to plyBlox. They are scripts which you can save anywhere in your project, except for under a folder of folder(s) named “Editor”. I suggest creating a folder like, /Assets/plyBlox Plugins/UniqueName/Blocks/ and saving your Block scripts under it.
Each Block is a class that is derived from plyBlock or one of the plyBloc value type classes. It also has an attribute that describes the Block and various fields and specific functions tho override.
Block Attribute
Each Block should have an attribute (meta data) describing the Block. What you use depends on the kind of Block but the following fields are available in the plyBlockAttribute:
- MainGroup: Main group this block belongs to. This is what you see in the drop-down above the list of Blocks in the editor.
- SubGroup: Sub-group this block belongs to. This is The groups you see in the list of Blocks.
- Name: Name shown in list of blocks.
- Description: Description of block will appear in help/ info area of Blox editor
- Type: Block type.
- Container: Container type blocks can contain and execute other blocks
- Action: Action blocks perform specific tasks and then return
- Variable: Variable blocks set a value that can be used by other blocks. Normally used as fields in other blocks
- Condition: Similar to Variable but should only set a Boolean value (True/ False). Normally used as fields in other blocks
- CustomStyle: If set then this style will be used rather than the default of the chosen block type. You normally want to set Variable Blocks that takes additional fields to a custom style as the light yellow colour is for ‘static’ type variables. Ex.
CustomStyle = "plyBlox_VarYellowDark" - Order: The order of the block’s sub-group. This should be the same as other blocks in the same sub-group else the order chosen may vary.
- FollowOnly: If set then this Block can only be added to the tail (below) of the specified block type(s). typeof(Something). The Else and ElseIf Blocks uses this so they can only follow after the If Block.
- ShowName: If set then this name will be shown when the block is in the Graph (main editor area of Blox editor). This will be the text the Block in the graph starts with and appear before any Fields follows. Simple Blocks that have no fields normally uses this while those with fields build the Block text up from the fields.
- ShowIcon: If set then the named icon will be used. plyBloxGUI.blockIcons contains all icons that can be used by this and your icon should have been added to blockIcons in a custom Editor Script that runs before the plyBlox editor is opened. The easiest way to add these icons is to create a InitializeOnLoad type editor script. Example follows later.
- ReturnValueString: [Variable/ Condition Block only] Text that is shown in the help panel. It basically tells the designer what kind of value this Block returns. Condition Blocks will normally read
ReturnValueString = "Return - Boolean"while variables Blocks will depend on the type, ex.ReturnValueString = "Return - String". - ReturnValueType: [Variable/ Condition Block only] Tells plyBlox what type the Block returns so that it knows into which Block fields this Block can be inserted. Condition Blocks should always be
ReturnValueType = typeof(Bool_Value)while variable Blocks will depend on the type, ex.ReturnValueType = typeof(String_Value). For variable Blocks it should normally be the same type the Block was derived from. - ShowInList: Set to false if this block should not be visible for picking for whatever reason.
Block Fields Attribute
Blocks can have their own fields. The Block properties and fields you see in the blocks in the editor. These must also have attributes (meta data) describing them. The fields must be public (and not properties) to be saved by plyBlox as part of the block’s initial data.
The following fields are available in the plyBlockFieldAttribute to describe a Block Fields.
- Name: Field’s name.
- SubName: Info shown in the Blox editor’s help/ info panel. Normally add here the field name and what type the field takes, ex
SubName = "Target - GameObject" - Description: Description shown in the Blox editor’s help/ info panel
- ShowName: Show name of field on the Block (in the Graph)? Default is false.
- ShowValue: Show value of field on the Block (in the Graph)? Sometimes you only want to show it as a property in the lower-right hand panel of the Blox editor and would then leave this false (default).
- EmptyValueName: Default is “-null-“. What to show when the field is empty (not set). if your Block can accept empty fields then you can indicate what default would be considered. For example a field that takes a Vector3 might allow that the designer do not set it and then assume vector zero. You can then show the designer that this would be the case by setting
EmptyValueName = "-0x0x0-". If a value must be specified you could enterEmptyValueName = "-invalid-"to make a point that the field is considered invalid until set. - CustomValueStyle: Custom style to use for the shown value. example:
CustomValueStyle = "plyBlox_BoldLabel". - ShowIcon: Name of icon to show before the field value would have been shown. This icon needs to be in the plyBloxGUI.blockIcons just like the case with Block attribute’s ShowIcon.
- ShowAfterField: Text to show after the field value would have been shown.
- DefaultObject: A default value/ object to create and initialise field with when field’s Block is added to graph. Ex.
DefaultObject = typeof(Int_Value)ShowIfTargetFieldInvalid: Leave as null (default) to ignore this setting. Set this to the name of a field to check in the Block. Only when the target field is invalid (null) will this field be shown. The name and icon will still be shown on a block, just not the value. On the Block the target field’s value will be shown if valid. This is used in advanced blocks where the field values may differ. For example, plyGame Skill related Blocks gives the designer the option to either choose a Skill from a list or enter its name. It would not be possible without this option.
Example InitializeOnLoad script to load Icon used in ShowIcon of plyBlock attribute. Since this is an Editor Script you must save it in a folder or sub-folder of a folder named “Editor”.
using UnityEngine;
using UnityEditor;
using plyCommonEditor;
using plyBloxKitEditor;

namespace myUniqueNamespace
{
  [InitializeOnLoad]
  public class MyEditorScript
  {
    static MyEditorScript()
    {
      EditorApplication.update += RunOnce;
    }

    private static void RunOnce()
    {
      EditorApplication.update -= RunOnce;

      // init things here that should be loaded once the editor is up
      // and would/ might cause errors if it executed in Constructor

      // load the icon that will be used in the Block attribute field "ShowIcon"
      // here you can use the plyEdGUI function to help with loading
      Texture2D icon = plyEdGUI.LoadEditorTexture("Assets/plyBlox Plugins/MyBlocks/Icons/ico1.png");

      // 'icon_name' should be a unique name of the icon as used with ShowIcon
      plyBloxGUI.blockIcons.Add("icon_name", icon);
    }
  }
}
Action Block
Action Blocks performs an action. They are the Blue Blocks you normally see in the editor. Action Blocks always derives from plyBlock.
using UnityEngine;
using plyBloxKit;

namespace myUniqueNamespace
{
  [plyBlock("Main Group", "Sub Group", "Block Name", BlockType.Action, Order = 50,
    Description = "A description of the Block")]
  public class MyBlock : plyBlock
  {
    // here you need to add the fields of your Block. Each field that should be saved must have a field attribute
    // and must be public. protected, private and property fields will not be saved/ serialized

    // example of a Block that takes an Integer field
    [plyBlockField("Foo", ShowName = true, ShowValue = true, DefaultObject=typeof(Int_Value), EmptyValueName="-error-", SubName="Foo - Integer", Description = "Some Integer value that is needed for some reason.")]
    public Int_Value foo;

    // example of a field where the value is chosen in lower-right panel of editor but the value
    // is show on the Block itself, as bold text.
    public enum Options { Option1, Option2, Option3 }
    [plyBlockField("with Option", ShowName = true, ShowValue = true, CustomValueStyle = "plyBlox_BoldLabel", SubName = "Option", Description = "Some option.")]
    public Options opts = Options.Option1;

    // example of field that is not shown on Block but only in the lower-right panel
    [plyBlockField("bar", SubName = "bar - String", Description = "Example.")]
    public string bar = "meh";

    // ============================================================================================================

    // This is called when the Block is created. This is a good place to check if the fields are valid.
    public override void Created()
    {
      // lets test if foo is set. If it is not set I will set blockIsValid = false
      // so that this Block is in an invalid state and will not Run()
      blockIsValid = (foo != null);

      // tell designer there is problem
      if (false == blockIsValid)
      {
        Log(LogType.Error, "Foo must be set.");
      }
    }


    // This is called in the Blox object's Start(), so this can be used to access values/ objects that
    // might not have been available by time Created() was called. Will not be called if blockIsValid == False
    public override void Initialise()
    {
    }

    // This is called when the Block should run. Will not be called if blockIsValid == False
    // The 'param' will be be set to whatever the preceding block returned, that
    // is if the return value was not a type that caused further block execution to stop.

    //The return type is normally BlockReturn.OK except if
    // it is a special case.  You can choose
    // to return BlockReturn.Error here which will cause the Block execution of the Event to Stop.
    public override BlockReturn Run(BlockReturn param)
    {
      // do stuff ...
      // for example, het the value of foo so I can use it
      int v = foo.RunAndGetInt();

      // lets assume a value smaller than 0 is an error case
      if (v < 0)
      {
        // Calling Log with LogType.Error will also cause blockIsValid to be set False
        // this will prevent this Block's Run from executing next time it would have
        Log(LogType.Error, "Foo should be zero or more.");

        // Tell the Event this was a bad error and the event should stop execution now
        return BlockReturn.Error;
      }

      Debug.Log("Foo's value = " + v);
      return BlockReturn.OK;
    }
  }
}
Variable Block
Variable Blocks are pretty much the same as the Action Block but has a return type and should set a value. Condition Blocks are similar to this but works with Bool_Value only.
The value types defined in plyBlox include the following. You can also define your own value type blocks. Example follows below.
- plyValue_Block: Not to be used as return type but can be used as a field type when the field can take any value.
- Bool_Value: Boolean
- Int_Value: Integer
- String_Value: String
- Rect_Value: Rect
- Vector2_Value: Vector2
- Vector3_Value: Vector3
- Color_Value: Colour
- plyBlox_Value: Reference to plyBlox object/ component
- plyVar_Value: Reference to a plyVar (Global, Local or Temporary variable, not its value but the variable object itself)
- Component_Value: Any class derived from MonoBehaviour/ Component
- GameObject_Value: GameObject
- UnityObject_Value: For use with Texture2D, SoundClip and other objects that derives from UnityEngine.Object. While Components and GameObject also derives from UnityEngine.Object you should rather use Component_Value and GameObject_Value for those.
- SystemObject: System.Object (object).
using UnityEngine;
using plyBloxKit;
using plyGame;

namespace myUniqueNamespace
{
  [plyBlock("Main Group", "Sub Group", "Player", BlockType.Variable, Order = 50, ShowName = "Player",
    ReturnValueString = "Return - GameObject", ReturnValueType = typeof(GameObject_Value),
    Description = "A description of the Block")]
  public class MyBlock : GameObject_Value
  {
    // note that this Block do NOT derive from plyBlock but from a value type Block
    // This Block takes no fields so I used ShowName to indicate what text to use
    // on the Block when placed in the main editor (Graph).
    // I'll also not add CustomStyle = "plyBlox_VarYellowDark" since this blocks is
    // considered a "static" value as it takes no fields that might change its result

    // ============================================================================================================

    public override BlockReturn Run(BlockReturn param)
    {
      // value is defined in GameObject_Value and similarly in the other Value type
      // Blocks and should be set as the result of this Block executing correctly

      if (Player.Instance != null)
      {
        value = Player.Instance.gameObject;
        return BlockReturn.OK;
      }

      // else
      value = null;
      Log(LogType.Error, "Player not yet set.");
      return BlockReturn.Error;
    }
  }
}
Example of creating a new Value type Block
using UnityEngine;
using plyBloxKit;

namespace myUniqueNamespace
{
  // example of how the Color_Value was defined
  [plyBlock("Common", "Values", "Color", BlockType.Variable, Order = 5,
    ReturnValueType = typeof(Color_Value), ReturnValueString = "Return - Color",
    Description = "A Color value. A Color has Red, Green, Blue and Alpha Float values.")]
  public class Color_Value : plyValue_Block
  {
    [plyBlockField("Value", ShowValue = true)]
    public Color value = Color.white;

    // this is the function normally called by a Block that
    // uses this value type in a field. You will note that
    // Int_Value as RunAndGetInt(). Float, String, etc
    // has similar functions
    public Color RunAndGetColor()
    {
      this.Run(BlockReturn.OK);
      return value;
    }

    // this is the default override and will return the value
    // as a System.Object. This must be present for cases
    // where the calling code do not know of the above
    // defined function and might trying to get the
    // value to be casted to a supported type
    public override object RunAndGetValue()
    {
      this.Run(BlockReturn.OK);
      return value;
    }

    // override this and return a string that represents
    // this Block's value
    public override string ToString()
    {
      return value == null ? "" : value.ToString();
    }
  }
}
Custom Events
You an add new Events to plyBlox. They are scripts which you can save anywhere in your project, except for under a folder of folder(s) named “Editor”. I suggest creating a folder like, /Assets/plyBlox Plugins/UniqueName/Events/ and saving your Events scripts under it.
An Event consist of the Event definition script and the Event handler script. The handler script can be used to handle more than one event definition. The following examples are from plyGame. Please use your own unique namespace and not the plyBlox, plyGame, etc namespace for your Block and Event definition to prevent conflicts with Blocks and Events declared in the official distribution.
Let’s first look at the Event Handler. This is basically a component that will be created on the same GameObject as the one the plyBlox is on that the event will be used in. An example event definition follows after this and then examples of how to trigger the events.
using UnityEngine;
using System.Collections;
using System.Collections.Generic;
using plyBloxKit;

namespace plyGame
{
  // tell Unity to not show this in the Component menu, else it would
  // have shown it since this is derived from plyEventHandler which
  // is a MonoBehaviour by setting empty string. AddComponentMenu("")
  [AddComponentMenu("")]
  public class EventHandler_Attributes : plyEventHandler
  {
    private List<plyEvent> attribEvents = new List<plyEvent>(0);
    private List<plyEvent> levelEvents = new List<plyEvent>(0);
    private List<plyEvent> xpEvents = new List<plyEvent>(0);
    private List<plyEvent> hpEvents = new List<plyEvent>(0);

    // ============================================================================================================

    public override void StateChanged()
    {
      // clear the event lists here
      attribEvents = new List<plyEvent>(0);
      levelEvents = new List<plyEvent>(0);
      xpEvents = new List<plyEvent>(0);
      hpEvents = new List<plyEvent>(0);
    }

    public override void AddEvent(plyEvent e)
    {
      // now add events to the correct lists. you basically look at
      // the name of the event, so make sure to give each event
      // that shared a group a unique name
      if (e.uniqueIdent.Equals("On Attribute Change"))
      {
        attribEvents.Add(e);
      }
      else if (e.uniqueIdent.Equals("On Level Change"))
      {
        levelEvents.Add(e);
      }
      else if (e.uniqueIdent.Equals("On XP Change"))
      {
        xpEvents.Add(e);
      }
      else if (e.uniqueIdent.Equals("On HP Change"))
      {
        hpEvents.Add(e);
      }
    }

    public override void CheckEvents()
    {
      // disable this component if there is nothing for it to do
      enabled = (attribEvents.Count > 0 || levelEvents.Count > 0 || xpEvents.Count > 0 || hpEvents.Count > 0);

      attribEvents.TrimExcess();
      levelEvents.TrimExcess();
      xpEvents.TrimExcess();
      hpEvents.TrimExcess();
    }

    // ============================================================================================================
    // Now follow the action callbacks. These function are called when the specific event should be triggered
    // For any of the events to run one of these function will have to be called.

    public void OnAttributeChange(ActorAttribute att)
    {
      // do not bother if there are none of this event defined for the current state of the Blox
      if (attribEvents.Count == 0) return;

      // note how the RunEvents() function can take extra params. This allows you to create the
      // temporary variables that will be set in the event. Each plyEventArg takes the
      // name of to give the temporary variable and the value to set that variable to.
      // If you have no variables to set then simply call RunEvent() without
      // the he extra arguments 'RunEvents(attribEvents);'

      RunEvents(attribEvents,
        new plyEventArg("attrib", att),
        new plyEventArg("attribValue", att.Value),
        new plyEventArg("attribConsumable", att.ConsumableValue)
      );
    }

    public void OnLevelChanged(int level)
    {
      if (levelEvents.Count == 0) return;
      RunEvents(levelEvents,
        new plyEventArg("level", level)
      );
    }

    public void OnXPChanged(ActorAttribute att)
    {
      if (xpEvents.Count == 0) return;
      RunEvents(xpEvents,
        new plyEventArg("attrib", att),
        new plyEventArg("attribValue", att.Value),
        new plyEventArg("attribConsumable", att.ConsumableValue)
      );
    }

    public void OnHPChanged(ActorAttribute att)
    {
      if (hpEvents.Count == 0) return;
      RunEvents(hpEvents,
        new plyEventArg("attrib", att),
        new plyEventArg("attribValue", att.Value),
        new plyEventArg("attribConsumable", att.ConsumableValue),
        new plyEventArg("wentDown", att.ConsumableValue < att.lastConsumableValue)
      );
    }
  }
}
The Event definition is a really simple script and basically gives the plyBlox editor info on the Event and links the event with its handler. Each Event definition should have the plyEventAttribute which described the event. The following fields are available in this attribute.
- Group: The group this Event belongs to. Can use slash/ path format to sub-group the event. For example, ‘Collision/with info’.
- Name: The name of the event. Should be unique within the Group.
- Description: The description and help shown in the help panel area of Blox editor.
using UnityEngine;
using plyBloxKit;

namespace plyGame
{
  [plyEvent("plyRPG/Attribute", "On Attribute Change",
    Description = "Called when the value of an Attribute of the Actor changes. This Event will only trigger in Blox on a Character object and child objects of it, like the Actor Class.\n\nThe following Temporary Variables will be set:\n\n" +
    "- <b>attrib</b>: The attribute (System.Object). This can be used with the data retrieval Blocks to get info like def.ident, name, def.meta, etc.\n" +
    "- <b>attribValue</b>: The attribute value.\n" +
    "- <b>attribConsumable</b>: The consumable value of the attribute.\n"
  )]
  public class AttribChangeEvent : plyEvent
  {
    public override System.Type HandlerType()
    {
      // here the Event is linked to the correct handled
      return typeof(EventHandler_Attributes);
    }
  }
}
To trigger the event will depend on your own code and from where you are trying to trigger it but there are a few ways this can be done. Since the Event Handler is a Component on a GameObject you can use Unity’s messaging system to broadcast a message to invoke the function in the event handler.
The events defined in the previous example are triggered by broadcasting a message from the ActorAttribute object. This class has a field called “owner” which references the ActorClass that contains this attribute and that class in turn as an “owner” field that references the Actor component, which is on the character game object. So I use owner.owner so I can broadcast the message in the the component which will result in the message going to all component on the same game object and thus ending up at the event handler which is a component in the same object.
private void Broadcast()
{
  owner.owner.BroadcastMessage("OnAttributeChange", this, SendMessageOptions.DontRequireReceiver);
  if (id == ActorAttributesAsset.Instance.xpAttribId) owner.owner.BroadcastMessage("OnXPChanged", this, SendMessageOptions.DontRequireReceiver);
  if (id == ActorAttributesAsset.Instance.hpAttribId) owner.owner.BroadcastMessage("OnHPChanged", this, SendMessageOptions.DontRequireReceiver);
  // ...
}
In the next example I will trigger the “OnActorDeath” event. This is done from a function defined in the Actor component and will cause any event handler (remember a component on the same object) listening for this event to be called. Note how here I did not send a parameter in BroadcastMessage as the OnActorDeath function does not take one.
public void Kill()
{
  // ...
  // broadcast to listeners
  gameObject.BroadcastMessage("OnActorDeath", SendMessageOptions.DontRequireReceiver);
}
Another way to handle events is to grab a reference to the handler and directly call the function whenever needed. The plyGame Player Manager uses this method.
public class PlayerManager: MonoBehaviour
{
  private EventHandler_PlayerManager eventHandler = null;

  protected void Start()
  {
    // if there is a plyBlox on the Player Manager and the "On Player Created" Event is used
    // in this plyBlox then the PlayerManager event handler will be added to this same
    // gameObject and can thus be found in the same way any other component is found

    eventHandler = gameObject.GetComponent<EventHandler_PlayerManager>();
  }

  public void SpawnPlayer(string ident, Transform targetTr)
  {
    // ... code that creates the player

    // finally call the event if any. remember to check for null since eventHandler could be null
    // if none of the events that it handles, are used in the Blox.
    if (eventHandler != null) eventHandler.OnPlayerCreated();
  }
for completeness, this is what the event and handler looks like for the last example.
[AddComponentMenu("")]
public class EventHandler_PlayerManager : plyEventHandler
{
  private List<plyEvent> playerCreatedEvents = new List<plyEvent>(0);

  public override void StateChanged()
  {
    playerCreatedEvents = new List<plyEvent>(0);
  }

  public override void AddEvent(plyEvent e)
  {
    if (e.uniqueIdent.Equals("On Player Created"))
    {
      playerCreatedEvents.Add(e);
    }
  }

  public override void CheckEvents()
  {
    enabled = (playerCreatedEvents.Count > 0);
    playerCreatedEvents.TrimExcess();
  }

  public void OnPlayerCreated()
  {
    if (playerCreatedEvents.Count == 0) return;
    RunEvents(playerCreatedEvents);
  }
}

[plyEvent("plyRPG/PlayerManager", "On Player Created",
  Description = "Called when the Player Manager created/ instantiated the Player Character object. The event us triggered in the Blox of the PlayeManager only."
)]
public class PM_PlayerCreatedEvent : plyEvent
{
  public override System.Type HandlerType()
  {
    return typeof(EventHandler_PlayerManager);
  }
}