Dialogue & Quest System
DiaQ is a Dialogue and Quest editor and engine. It has editors that makes it easy to create the conversations and quests in a visual manner, while providing a run-time API to interact with the graph (conversations) and quests. There is also an editor API to extend the editor side of DiaQ.
The DiaQ sample scene and scripts an be found in Assets/plyoung/DiaQ/plygame.unitypackage.
Note: If you use this tool with plyGame then some extra features will be available to interact with the plyGame visual scripting system. plyGame is not needed for DiaQ to function and can be used without it. This documentation will indicate when a feature is only available when using DiaQ with plyGame. If you want the extra features provided in plyGame then you will have to install the package found in Assets/plyoung/DiaQ/diaqsample.unitypackage.
DiaQ Settings
 The DiaQ Settings can be accessed from the menu:
 Tools > PLYoung > DiaQ > Settings or the Gear icon on the Graph Editor’s toolbar.
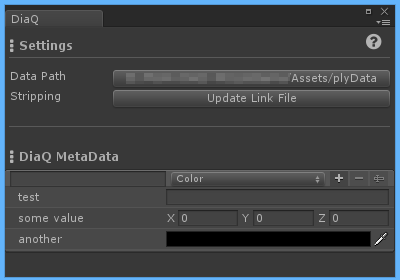
The Settings window will allow you to move the DiaQ data (you should not move it in any other way), and to generate a link.xml file. If you build for a mobile device and choose stripping then a link.xml file will be needed as DiaQ makes use of reflection and Unity would be unable to determine what parts of DiaQ to not strip out of the final build.
You can also create DiaQ Meta Data in the settings window. These values can be accessed in the Graph Editor or at run-time. These values, except the GameObject and UnityObject types, can also be saved and restored at runtime.
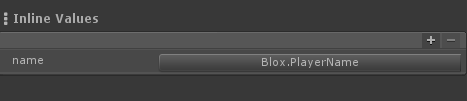 Inline Values, used in Nodes and Quests, are defined in the settings window. Inline Values provides a way to insert variable values into text at run-time. Here you define the values by giving each a unique name and specifying where the value data will come from. When using plyGame (and Blox) you could for example specify that data comes from a plyBlox Global Variable.
To use a defined value you simply use the special syntax in any text that supports it. Anywhere in the text where curly brackets are used the text will be parsed to see if it is an inline value name {inline-value-name}. For example, in a Dialogue Node’s text you could greet the player by a name; "Hello {name}, would you like to do a task for me?". In this example {name} would be replaced by the value data.
Graph Editor (Dialogue flow editor)
 In DiaQ a flow of dialogue/ conversation is known as a Graph, consisting of Nodes. The Graph editor can be opened from the menu:
 Tools > PLYoung > DiaQ > Editor or the plyGame toolbar if you are using plyGame.
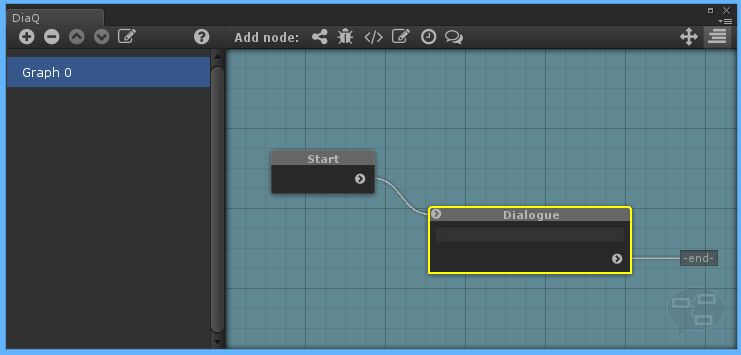
The dialogue flow of DiaQ is handled by Graphs with linked nodes. The Graph editor is used to create these. When a Graph is run the flow will begin at the Start Node and move through the links to the next node.
Flow from node to node can be interrupted or delayed, depending on the node involved. Some nodes may have more than one link to other nodes and decide which one the flow should follow. This allows for branching in a conversation (Graph).
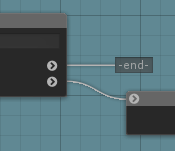
When there are no more nodes linked the automatic end node is assumed and the Graph’s flow stops.
To the left is the list of graphs and to the right the graph panel (with blue background in image). To add a new graph, simply click the (+) icon. There are also buttons to rename a graph, move it up or down in the list or delete the selected graph.
With a graph selected you will see the graph’s properties in the Inspector panel. If you do not see any options, simply click on the graph again in the list of graphs and it will become active in the inspector.
From the graph toolbar (toolbar just above the graph panel) you can select nodes to add to the graph. They will be placed in the center of the graph panel when added for the first time. Hover over the toolbar buttons to see a description of each button and what kind of node will be added. The nodes available will depend on what plugins you have installed. A list of nodes are available lower down on this page.
You will note that all graphs has a Start node. This node can not be deleted or linked to. It has only one out-link and is where flow of the graph starts when the graph is activated.
The graph panel can be moved around if you click and hold the left mouse button on the blue background while moving the mouse. You can also move individual nodes by left click and hold on them while moving the mouse. All nodes linked to a node being moved can be moved at the same time if you hold Shift while moving a node.
 In-links are identified by the icon in the top-left corner of a node. If there is no icon then it means you may not link to the node.
Out-links are identified by icons to the right-hand side of the node. If there are no icons then it means the node has no out-links. By default all out-links be linked to a special ‘end node’, which means the graph will end when it reaches that point.
To link nodes to each other you need to click on the out-link of a node and then move the mouse over another node (that has an in-link) and click on that node. The linking action will be canceled if you press any key or any other mouse button than the left button or if you click on anything other than a node with an in-link.
To unlink you simply click on the out-link in question and then click anywhere in the graph panel (not on another node) and the link from the out-link to the previous in-link will be broken.
You can select a Node by left clicking on it. A selected node is shown with a yellow frame around it. The node’s properties will be displayed in the Inspector Panel and can be configured there. Some nodes might also allow you to configure it within the graph panel. Press the Esc button to unselect a node.
To delete a node, simply select it and hit Delete on the keyboard or right-click on the node and select delete from the context menu. A node can be duplicated with the Ctr+D shortcut or via the context menu. A duplicated node will appear in the center of the graph panel and can then be moved around and linked like any other node.
Graph Inspector
 You will find various properties of the selected Graph in the Inspector.
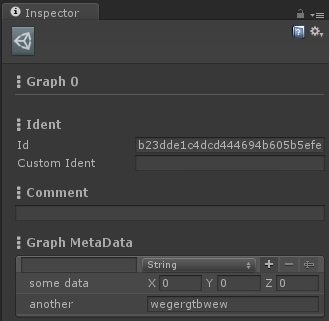
The Id can not be changed but you can use the Custom Ident to enter a value that can later be used to find the Graph by, if you choose to not use other methods like using its name.
Each Graph can carry its own set of meta data. These are values you can define and then access in the graph editor or in run-time code. These values, except the GameObject and UnityObject types, can also be saved and restored at runtime.
Node Inspector
 The properties you see in the Inspector when a node is selected will depend on what kind of node it is. Have a look at the documentation on the various nodes (later on this page) to see what the properties of a specific node means.
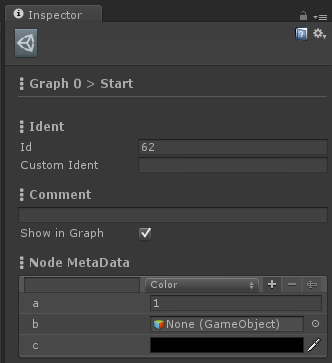
The Id can not be changed but you can use the Custom Ident to enter a value that can later be used to find the Node by, if you choose to not use other methods available.
Each Node has its own set of meta data. These are values you can define and then access in the graph editor or in run-time code. These values, except the GameObject and UnityObject types, can also be saved and restored at runtime.
Quest Editor
 The Quest Editor is used to set up all the quests used in the game. Use the (+) button to add a new quest. To rename a quest you will have to use the rename button, 5th in the quests toolbar. You may also delete [-] or move the selected quest in the list.
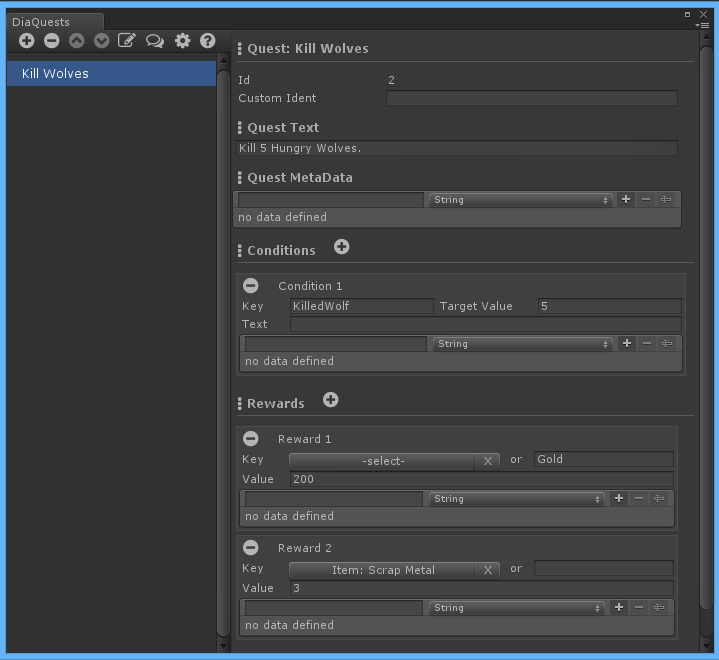
Every quest as a unique id (integer). You can’t change this but you may enter a Custom Ident. In the API you can use either the id, custom ident or quest’s name to lookup a quest.
The Quest Text can be entered and is especially useful when you link a quest with a dialogue node and the append the quest text to the Quest giver NPC’s conversation text. It also helps remember what this quest is all about. Another use for this text is in the quest log.
Each quest can have its own set of metaData. You can use this any way you like. The data is available via the run-time API. It can even be changed at runtime and make part of the quest’s saved data.
Conditions
Use the (+) button to add conditions. Conditions determines when the quest will be considered completed.
Each condition must have a Key to identify the Condition. The key does not have to be unique among quests, depending on which runtime function is used to update conditions. It is possible to update the same key in all quests sharing the same condition key name or only per quest. So you can have one wolf kill count towards 2 quests if both quests has a condition like this.
The Target Value is how many times the condition should be updated (performed) before it is met. So in this example it means how many wolves should be killed.
You can optionally add Text to the condition. This might be useful to display in a quest log. You can also add metaData to each condition.
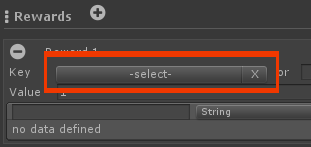
Rewards
Lastly we have the Rewards that the player will receive for completing the quest. There are two ways to handle rewards. plyGame users will always use the selection method (click select button to select reward) and should not use the reward key string.
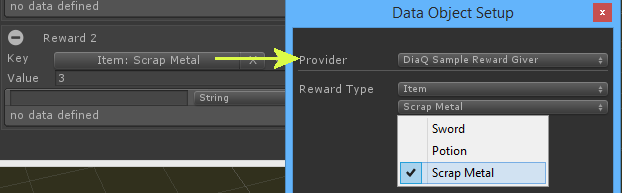 As with conditions, you may enter a key string that identifies what the reward should be. This could be strings like “Gold”, “XP”, and “AwesomeSword” and will depend on your game design and code. Have a look at the included sample scene and scripts to see how you can detect what was entered here and act accordingly. The sample also shows how you can create your own reward handler that can then allows you to select the reward rather then entering a key string. Being able to select the reward is a much better option, especially when more than one person works on the same project and you do not want to deal with wrong keys being entered.
You can also enter a value which represent how much of the specified reward the player should receive; that is, 200 Gold and 3 pieces of Scrap Metal.
Each rewards can also have metaData added if you need to attach additional information to a reward entry.
Nodes
Start

The Start node is the very first node of a Graph. All graphs has this node and it can’t be deleted.
Debug
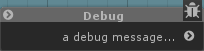
The Debug node is useful for when you want to see if the graph is following the nodes as expected or to investigate what a variable value might be at a certain point in the graph. It will print a message and optional value to the Unity console.
Node Properties
Message Label is the message you want printed to the console. You can also specify a value that should be printed to the console. See Data Providers to learn more about the value option.
Send Message

This node is used to invoke a method of a component in the target object. This is basically a wrapper for Unity’s SendMessage function.
Node Properties
Target allows you to specify how to find the object that the message must be send to. It can be found by either Name, Tag or Component Type. There is also the option Active, which means the currently set Active GameObject of the Graph. This is whatever the static plyGraph.activeGO is set to. Self is the instance of the GraphManager’s GameObject in the scene.
Method Name is the name of a method in one (or more) of the components of the object and value is the optional string value that should be passed along to the method.
The value field is where the value, send to the called method, should come from.
Set Value
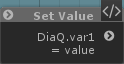
The Set Value Node allows you to set a value for a variable provided by a Data Provider.
Node Properties
First you need to select and setup the data provider. When you use the button next to set a window will come up where you configure the data provider.
Then you can select what type of value to set and enter the value.
Wait
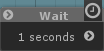
The Wait Node will cause the Graph to wait a number of seconds before moving on to the next node.
Condition
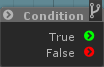
This node is used to branch divert the flow depending on the result of one or more conditions. The result can be either True or False and the node linked to the result will be next to run.
Node Properties
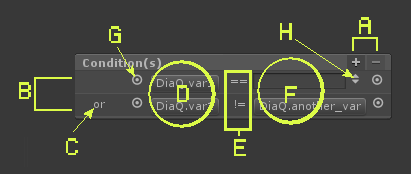 A) In the properties you will see the option to add conditions, via (+) button. If you click on a condition line the delete (-) button will become available to remove that condition.
B) Conditions appears one below the other and it processed top-down. Each condition can compare two values to each other to get to a True or False result.
C) Click in this area to set how the result of the condition in this line will be combined with the result of the condition in the previous line. You will note the 1st condition has no combine option. You can choose either AND or OR.
- True AND True = True
- True AND False = False
- False AND True = False
- False AND False = False
- True OR True = True
- True OR False = True
- False OR True = True
- False OR False = False
D) These are the 1st values to use in the comparison. The Type of this value will determine the kind of comparison that can be performed. The second value will be converted to the same type as the first, if it differs and if conversion is possible, before doing the comparison. SO you can compare a FLoat with an Integer value for example. These can either be values you enter directly or vales provided by a data provider. You can switch it via the button (G).
E) This is the comparison operator. Click on it to change between the options. Not all operators can be used with all types. You can for example only use ‘Equal’ and ‘Not Equal’ on Unity Objects and will get an error if you try to use another operator.
- == : Equal to
- != : No Equal to
- < : Smaller than
- <= Smaller or equal to
- > Bigger than
- >= Bigger or equal to
F) These are the 2nd values.
G) These buttons allows you to switch between having to enter a value or select a data provider for the value.
H) If you are in the value mode then you can switch the type of value with this button. Hover the mouse cursor over this button to see what Type is active.
Dialogue
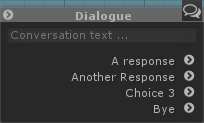
The Dialogue Node will block the flow until a choice is made. You can have any number of choices (branches) that can possibly be followed. This node could be used anywhere where you want to wait until the player has chosen one of the presented option and is not necessarily just for conversation.
plyGame provides Blocks with which to respond to the Node. In code you respond via DiaQEngine.Instance.graphManager.SendDataToNode(a_number). The number you specify is associated with the response. The first will be (0), the second (1), the third (2), and so on.
Node Properties
Dialogue Text can be any text you want to associate with this node, for example something an NPC might say to the player.
Next you specify how many Responses there are and can enter text associated with each response. These could for example be the the text presented to the player in the interface when he needs to choose how to respond to the NPC’s message.
Accept Quest
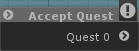
Use this node to place a Quest in an “accepted” mode, meaning the player is now on this quest. Be careful to not give the player a quest he is already on or has completed as this node will reset the quest progress. Use the “Quest Status” node to check if the player is already on a specific quest.
Node Properties
Quest is the quest to accept
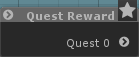
Quest Reward
 The node is used to give the player rewards. This will only work if you use the key object (button where you select the reward) rather than make use of a string value for the reward key. If you use string keys then you will use other methods to give rewards, for example using a send message node to trigger a method that you then use to grun through the reward keys and give the rewards. If you are using DiaQ stand-alone then have a look at the included sample scene and scripts to learn how to work with both reward string keys and reward handlers. In plyGame you will not make use of the reward string keys and will always select the reward handler and rewards from those provided.
Node Properties
Quest is the quest from which the rewards are given
Quest Status
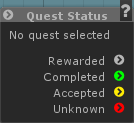
This node will branch the flow of the graph depending on the status of the Quest. The decision on which branch to follow runs from top-down. So first the quest is checked to see if the player has received the quest reward, if he has then it is assumed he was on the quest and completed it. If the quest reward was not given then it will check if the quest has been completed and follow that path, else check if the quest has been accepted and the player is still working on completing it, and finally the last branch will execute if the quest has not yet been accepted (or completed or rewarded).
Node Properties
Quest is the quest in question
Trigger Event
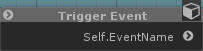
plyGame Only
Use this node to trigger an Event in a plyBlox on a target GameObject.
Node Properties
Target allows you to specify how to find the object that has the plyBlox component. It can be found by either Name, Tag or Component Type. There is also the option Active, which means the currently set Active GameObject of the Graph. This is whatever the static plyGraph.activeGO is set to. Self is the instance of the GraphManager’s GameObject in the scene.
Event Name is the name of the Event to trigger. This will most likely be the name of a Common > Custom Event that you renamed.