Make RPG: Player Manager and Customization
plyGame’s included RPG Module makes it easier to spawn a player character into the scene via the Player Manager. There is also the Simple Customizer which can be used to change the material, colour, and texture used or even objects that are visible.
The player models
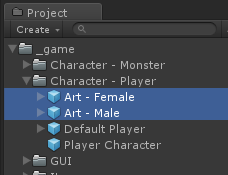
The first thing we need to do is create the prefabs that will represent the male and female player character’s models (art). These will not be created as child objects of any player character prefab like we did in the previous guide since the player manager will be used and require the models to be stand-alone prefabs.
I’ll show the female as an example but the male was created in the same way with different meshes. I will call the one prefab Art - Male and the other Art - Female.
Because I am using the Simple Customizer I need to include all body parts in the prefab. For example, all the hair styles will be present. In fact, I will also include all the clothing that the character can use (not shown in screenshot) but that is a topic for another time. I will keep the first hair object active and disable the other 4 (there are 5 hair styles in this character). On the art - female object I will place the customizer component, menu: Component > plyGame > Systems > Simple Customizer.
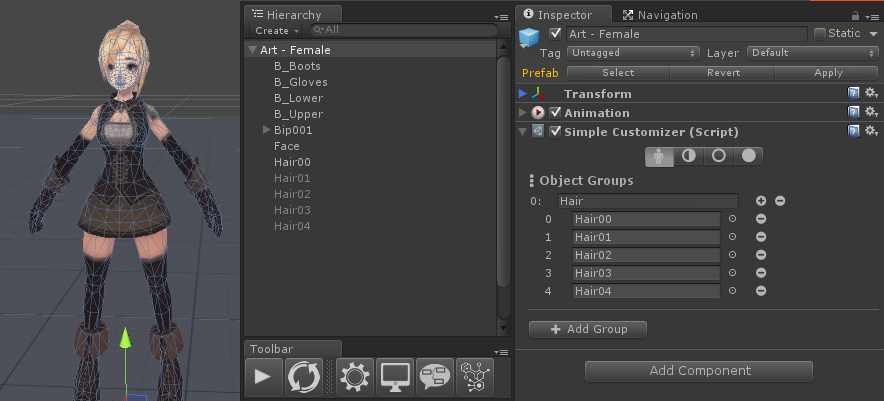
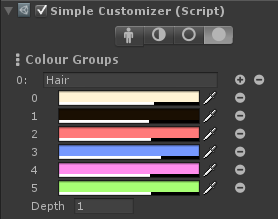
The customizer has 4 tabs in it inspector, allowing you to configure object, material, texture and colour groups. For each of the 4 areas you can create any number of groups.
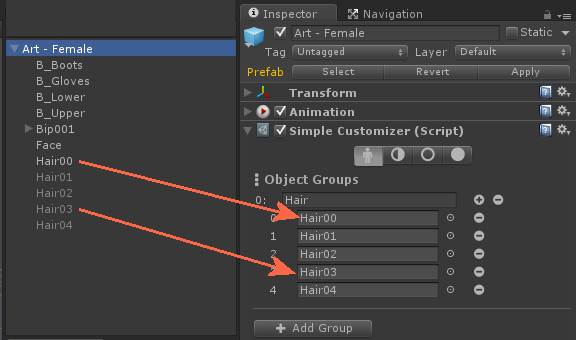
I’ll create an Object Group called Hair. Add 5 fields to the group and drag each hair object from the female prefab into these fields. With this setup I am telling the system that only one of the objects in that list may be active at a time, so the other ones will be deactivated and that is how I can then have one of the hair styles active at a time.
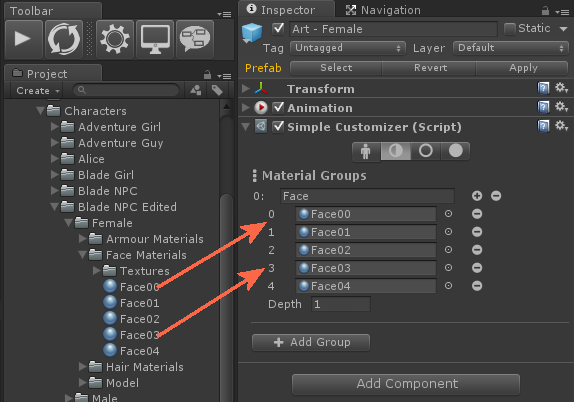
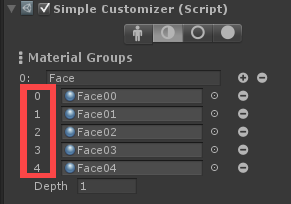
To change the face I will make use of materials, so I will create one Materials Group and add 5 fields to it for each of the faces. In here I will drag each of the material faces that I’ve created. I will name this group, Face. The way this works is quite simple, you will tell it to use material of the specific index and that material will be applied to any object that starts with the same name as the name of the group. The value in Depth will control how deep in the hierarchy of child objects the system will go to find objects that starts with the specified name. In this case I leave the Depth = 1 so that only the direct child objects of the art - female object will be looked at. This will result in only Art - Female/Face being detected and the selected material being applied to it.
Finally I will create a Colour Group that will control the hair colour. Here I will create a group called Hair and add 6 colours. Like the case with material, the colours also use the group name, in this case Hair, and depth to determine what objects the selected colour should be applied to. In this case the selected colour is applied to all direct child objects starting with the word, Hair: Art - Female/Hair00, Art - Female/Hair01, etc.
I’ve made sure to give my male and female objects the exact same number of hair, colour and face options. This will make it easier to switch between these later. If I have the female 7 hair styles and the male only 5 hair styles then things would be a bit more complicated. You will see what I mean when you look at the Blocks that switch between the styles.
Player Select Screen
 I’ve created a custom screen called
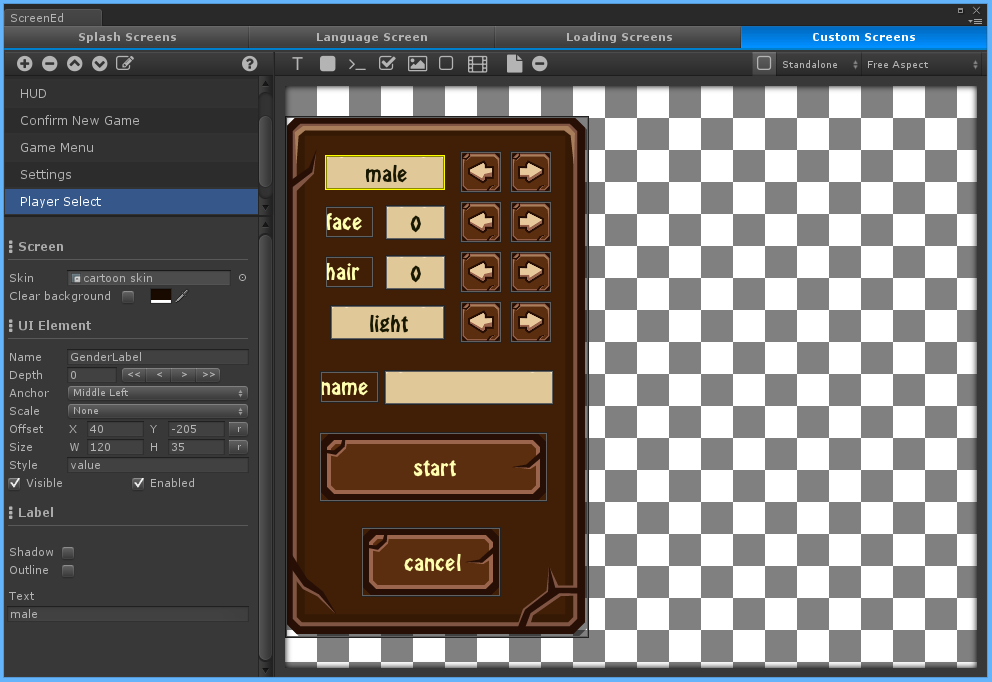
 Player Select, which will be shown when the player select scene is loaded. This screen will be used to change what the player sees in the scene; making changes to the appearance of his character. The scene and screen will work together to create the player select experience.
Lets first look at what the screen looks like. The player will be allowed to switch the gender of the character, change face and hair styles, and change the colour of the hair. He will also be required to enter a name before start can be pressed. The cancel button will return to the main menu.
I’ve named all the labels so that the text on them can be changed when needed.
- Gender select:
GenderLabel - Face select:
FaceLabel - Hair select:
HairLabel - Colour select:
ColourLabel
The name input element is named, NameEd.
When the cancel is pressed the Back to MainMenu Event is triggered.
[@E:Common > Custom:: Back to MainMenu@]
[@B:GUI > Screens (plyGame) > Show Custom Screen:: Show Screen: [H:Show Screen:Main Menu:H][V:Show Screen:Main Menu:V] [H:AdditiveFalse:H]@]
 The
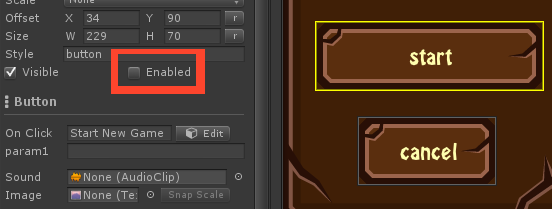
The start button is disabled by default and will only become active when the player has entered a character name. To check if the button should be on or off I added a Common > On LateUpdate Event to the Screens System’s Blox. It will only check if there is text in the NameEd field as long as the player select screen is active.
[@E:Common > On LateUpdate:: On LateUpdate@]
[@C:Flow > Condition > If:: If [@B:GUI > Screens (plyGame) > Screen is Visible:: Screen: [H:Screen:Player Select:H][V:Screen:Player Select:V] is visible? @] @]
    [@C:Flow > Condition > If:: If [@B:Flow > Comparison > String Is Empty:: [@B:GUI > Screens (plyGame) > Get Text:: Get Text from [H:Get Text fromNameEd:H][V:Get Text fromNameEd:V] on [H:onPlayer Select:H][V:onPlayer Select:V] @] is empty @] @]
        [@B:GUI > Screens (plyGame) > Set Enabled:: Set [H:SetStartButton:H][V:SetStartButton:V] on [H:onPlayer Select:H][V:onPlayer Select:V] to [H:stateDisabled:H][V:stateDisabled:V] @]
    [@C:Flow > Condition > Else:: Else @]
        [@B:GUI > Screens (plyGame) > Set Enabled:: Set [H:SetStartButton:H][V:SetStartButton:V] on [H:onPlayer Select:H][V:onPlayer Select:V] to [H:stateEnabled:H][V:stateEnabled:V] @]
    [@C:  end  @]
[@C:  end  @]
The Scene
 Before looking at the Events triggered by the buttons related to gender, face, hair, and colour, we need to look at how the player select scene works as it will determine how the events will work.
When the player choose to start a new game a scene named player_select will be loaded. Remember that this scene should be added to your build settings list (as explained in the previous guide).
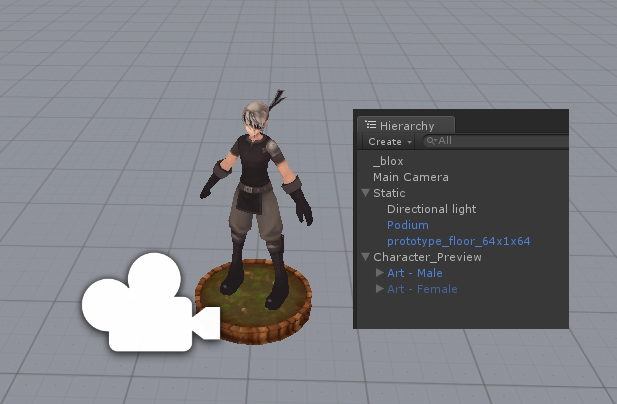
The scene includes a simple floor, a podium for the character to stand on, a direction light and a camera. There are also two very important objects, the male and female player character prefabs that where previously created.
I’ve disabled the Art - Female object so that only the male one is visible when the scene is loaded. This is the default gender that will be available and only when the player click one of the gender change buttons will I switch on the female object and disable the male object.
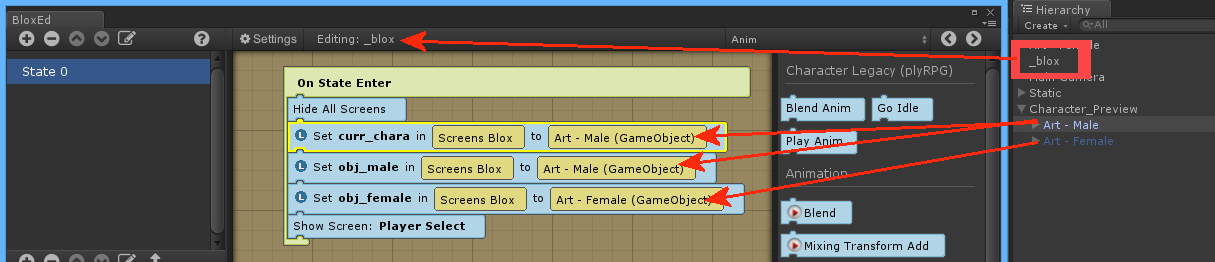
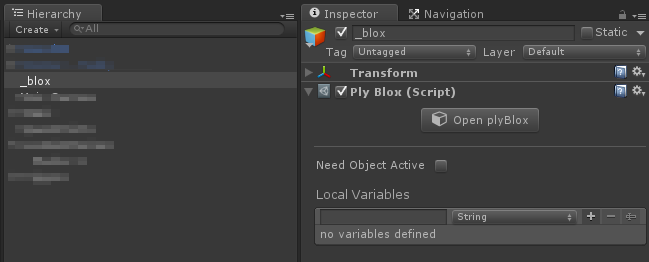
The _blox object is simply an empty GameObject that has a plyBlox Component on it. In this Blox I will react when the player select scene is done loading by adding the following Blocks to the On State Enter Event. First Hide All Screens is called to get rid of the Loading Screen, then some Local Variables are initialised and finally the Player Select screen is shown.
Remember that Local Variables are local to the specified object, in this case the variables curr_chara, obj_male, and obj_female are created and will belong to the Screens System’ Blox. You will note that the second field of the Set Block is set to Screens Blox, which will return a reference to the Blox object of the SCreens System. This means the variables are being created in the Screens System’s Blox. I can do it in this way because the Screens System object will be active by the time this event runs as it is created as soon as the game starts.
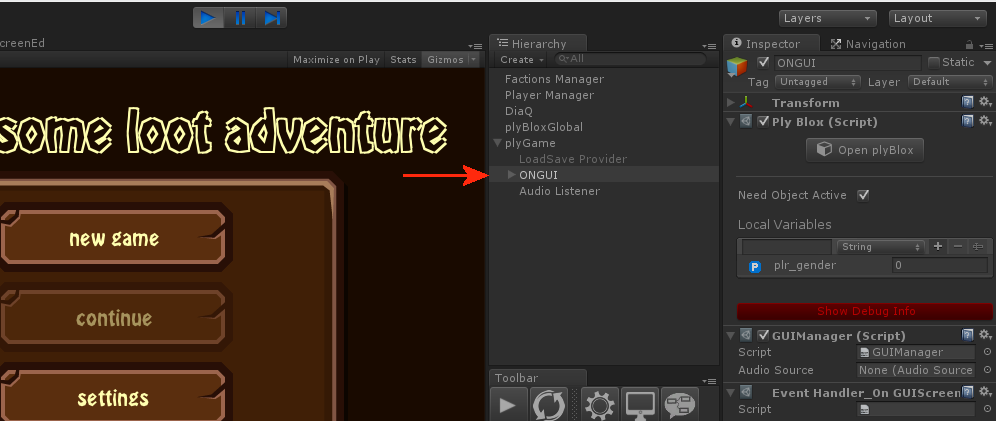
Screens Blox is the plyBlox Component on the GameObject named, ONGUI, when the game is running.
I could not set the local variables of the Screen System Blox directly by dragging the objects from the scene into the local variables of the prefab as you may not assign values from a scene to properties in a prefab. Unity will loose these references (connections) as soon as the scene is closed!
The variables are set to the male and female objects so that I can easily access them when needed.
curr_chara: the currently active (visible) character objectobj_male: the object that represents the male characterobj_female: the object that represents the female character
[@E:Common > On State Enter:: On State Enter@]
[@B:GUI > Screens (plyGame) > Hide All Screens:: Hide All Screens @]
[@B:Variables > Local Variables > Set Local Value:: Set [H:Setcurr_chara:H][V:Setcurr_chara:V] in [@B:GUI > Screens (plyGame) > Get Blox:: Screens Blox@] to [@B:Common > Values > GameObject:: [H:ValueArt - Male (GameObject):H][V:ValueArt - Male (GameObject):V] @] [H:persistFalse:H]@]
[@B:Variables > Local Variables > Set Local Value:: Set [H:Setobj_male:H][V:Setobj_male:V] in [@B:GUI > Screens (plyGame) > Get Blox:: Screens Blox@] to [@B:Common > Values > GameObject:: [H:ValueArt - Male (GameObject):H][V:ValueArt - Male (GameObject):V] @] [H:persistFalse:H]@]
[@B:Variables > Local Variables > Set Local Value:: Set [H:Setobj_female:H][V:Setobj_female:V] in [@B:GUI > Screens (plyGame) > Get Blox:: Screens Blox@] to [@B:Common > Values > GameObject:: [H:ValueArt - Female (GameObject):H][V:ValueArt - Female (GameObject):V] @] [H:persistFalse:H]@]
[@B:GUI > Screens (plyGame) > Show Custom Screen:: Show Screen: [H:Show Screen:Player Select:H][V:Show Screen:Player Select:V] [H:AdditiveTrue:H]@]
I simply drag and drop the objects from the hierarchy onto the Blocks to set the fields.
The Screen Events
Now we can look at what all the buttons on the Player Select Screen will do.
Screen Shown
When the Player Select screen is shown I want to make sure the values displayed on the screen is valid. So the following IF Block is inserted in the On Screen Shown Event. Keep in mind that you already have other Blocks in this Event (like the one that starts the main menu music). Do not remove these, simply add the new If Block too.
[@C:Flow > Condition > If:: If [@B:Flow > Comparison > String: a = b:: [@B:Common > Values > String:: [H:ValuePlayer Select:H][V:ValuePlayer Select:V] @] = [@B:Variables > Temp Variables > Get Temp String:: [H:GetscreenName:H][V:GetscreenName:V] as String @] @] @]
    [@B:Flow > System > Trigger Event:: Trigger Event [@B:Common > Values > String:: [H:ValueReset PlayerSelect Screen:H][V:ValueReset PlayerSelect Screen:V] @] in [@B:Self (plyBlox)@] after [@B:-none-@] seconds with param 1= [@B:-none-@] , 2= [@B:-none-@] and 3= [@B:-none-@] @]
[@C:  end  @]
Al it does is to trigger the Reset PlayerSelect Screen Event. It will reset all the values to the defaults. This is needed because when the player click on cancel the values of the screen object will not reset. So if the player made changes, pressed cancel, and then pressed new game again you would have a mess cause the scene that was loaded will be showing the male character in a default state while the variables might indicate that the femae is active and some different hair style and face is chosen.
[@E:Common > Custom:: Reset PlayerSelect Screen@]
[@B:Variables > Local Variables > Set Local Value:: Set [H:Setplr_gender:H][V:Setplr_gender:V] in [@B:-self-@] to [@B:Common > Values > Integer:: [H:Value0:H][V:Value0:V] @] [H:persistFalse:H]@]
[@B:Variables > Global Variables > Set Global Value:: Set [H:Setplr_face:H][V:Setplr_face:V] to [@B:Common > Values > Integer:: [H:Value0:H][V:Value0:V] @] [H:persistFalse:H]@]
[@B:Variables > Global Variables > Set Global Value:: Set [H:Setplr_hair:H][V:Setplr_hair:V] to [@B:Common > Values > Integer:: [H:Value0:H][V:Value0:V] @] [H:persistFalse:H]@]
[@B:Variables > Global Variables > Set Global Value:: Set [H:Setplr_col:H][V:Setplr_col:V] to [@B:Common > Values > Integer:: [H:Value0:H][V:Value0:V] @] [H:persistFalse:H]@]
[@B:GUI > Screens (plyGame) > Set Text:: Set Text of [H:Set Text ofGenderLabel:H][V:Set Text ofGenderLabel:V] on [H:onPlayer Select:H][V:onPlayer Select:V] to [@B:Common > Values > String:: [H:Valuemale:H][V:Valuemale:V] @] @]
[@B:GUI > Screens (plyGame) > Set Text:: Set Text of [H:Set Text ofFaceLabel:H][V:Set Text ofFaceLabel:V] on [H:onPlayer Select:H][V:onPlayer Select:V] to [@B:Common > Values > String:: [H:Value0:H][V:Value0:V] @] @]
[@B:GUI > Screens (plyGame) > Set Text:: Set Text of [H:Set Text ofHairLabel:H][V:Set Text ofHairLabel:V] on [H:onPlayer Select:H][V:onPlayer Select:V] to [@B:Common > Values > String:: [H:Value0:H][V:Value0:V] @] @]
[@B:GUI > Screens (plyGame) > Set Text:: Set Text of [H:Set Text ofColourLabel:H][V:Set Text ofColourLabel:V] on [H:onPlayer Select:H][V:onPlayer Select:V] to [@B:Common > Values > String:: [H:Valuelight:H][V:Valuelight:V] @] @]
[@B:Object > Customizer (plyRPG) > Change Material:: Change Material to [@B:Common > Values > Integer:: [H:Value0:H][V:Value0:V] @] on [@B:Common > Values > String:: [H:ValueFace:H][V:ValueFace:V] @] of [@B:Variables > Local Variables > Get Local GameObject:: [H:Getobj_male:H][V:Getobj_male:V] in [@B:-self-@] as GameObject @] [H:Cache targetFalse:H]@]
[@B:Object > Customizer (plyRPG) > Change Material:: Change Material to [@B:Common > Values > Integer:: [H:Value0:H][V:Value0:V] @] on [@B:Common > Values > String:: [H:ValueFace:H][V:ValueFace:V] @] of [@B:Variables > Local Variables > Get Local GameObject:: [H:Getobj_male:H][V:Getobj_male:V] in [@B:-self-@] as GameObject @] [H:Cache targetFalse:H]@]
[@B:Object > Customizer (plyRPG) > Change Object:: Change Object to [@B:Common > Values > Integer:: [H:Value0:H][V:Value0:V] @] on [@B:Common > Values > String:: [H:ValueHair:H][V:ValueHair:V] @] of [@B:Variables > Local Variables > Get Local GameObject:: [H:Getobj_male:H][V:Getobj_male:V] in [@B:-self-@] as GameObject @] [H:Cache targetFalse:H]@]
[@B:Object > Customizer (plyRPG) > Change Object:: Change Object to [@B:Common > Values > Integer:: [H:Value0:H][V:Value0:V] @] on [@B:Common > Values > String:: [H:ValueHair:H][V:ValueHair:V] @] of [@B:Variables > Local Variables > Get Local GameObject:: [H:Getobj_female:H][V:Getobj_female:V] in [@B:-self-@] as GameObject @] [H:Cache targetFalse:H]@]
[@B:Object > Customizer (plyRPG) > Change Color:: Change Color to [@B:Common > Values > Integer:: [H:Value0:H][V:Value0:V] @] on [@B:Common > Values > String:: [H:ValueHair:H][V:ValueHair:V] @] of [@B:Variables > Local Variables > Get Local GameObject:: [H:Getobj_male:H][V:Getobj_male:V] in [@B:-self-@] as GameObject @] [H:Cache targetFalse:H]@]
[@B:Object > Customizer (plyRPG) > Change Color:: Change Color to [@B:Common > Values > Integer:: [H:Value0:H][V:Value0:V] @] on [@B:Common > Values > String:: [H:ValueHair:H][V:ValueHair:V] @] of [@B:Variables > Local Variables > Get Local GameObject:: [H:Getobj_female:H][V:Getobj_female:V] in [@B:-self-@] as GameObject @] [H:Cache targetFalse:H]@]
Change Gender

The buttons will trigger the Event Change Gender with param1 = 0 (left) and param1 = 1 (right). When Gender is changed I will first reset everything by triggering the Reset PlayerSelect Screen Event.
Then I look at what the value of param1 is. If it is 1 then I know the right-hand button was clicked and thus the female character should be used, else the male character is used (left-hand button sets param1 to 0).
The local variable (of the screens system), plr_gender is set to either 1 or 0 depending on which gender is active currently. Then the label is updated to read male or female. Next I enable and disable either the male and female object so that the player sees the correct model in the scene. Remember how the local variablesobj_femaleandobj_male` where set before to point to these objects?
Finally the curr_chara variable is set to point to what the currently visible object is. This is done so that t is easy to update the face, hair, etc of the “active” object.
[@E:Common > Custom:: Change Gender@]
[@B:Flow > System > Trigger Event:: Trigger Event [@B:Common > Values > String:: [H:ValueReset PlayerSelect Screen:H][V:ValueReset PlayerSelect Screen:V] @] in [@B:Self (plyBlox)@] after [@B:-none-@] seconds with param 1= [@B:-none-@] , 2= [@B:-none-@] and 3= [@B:-none-@] @]
[@C:Flow > Condition > If:: If [@B:Flow > Comparison > String: a = b:: [@B:Variables > Temp Variables > Get Temp String:: [H:Getparam1:H][V:Getparam1:V] as String @] = [@B:Common > Values > String:: [H:Value1:H][V:Value1:V] @] @] @]
    [@B:Variables > Local Variables > Set Local Value:: Set [H:Setplr_gender:H][V:Setplr_gender:V] in [@B:-self-@] to [@B:Common > Values > Integer:: [H:Value1:H][V:Value1:V] @] [H:persistFalse:H]@]
    [@B:GUI > Screens (plyGame) > Set Text:: Set Text of [H:Set Text ofGenderLabel:H][V:Set Text ofGenderLabel:V] on [H:onPlayer Select:H][V:onPlayer Select:V] to [@B:Common > Values > String:: [H:Valuefemale:H][V:Valuefemale:V] @] @]
    [@B:Object > Object > EnDisable GameObject:: [H:StateEnable:H][V:StateEnable:V] [@B:Variables > Local Variables > Get Local GameObject:: [H:Getobj_female:H][V:Getobj_female:V] in [@B:-self-@] as GameObject @] @]
    [@B:Object > Object > EnDisable GameObject:: [H:StateDisable:H][V:StateDisable:V] [@B:Variables > Local Variables > Get Local GameObject:: [H:Getobj_male:H][V:Getobj_male:V] in [@B:-self-@] as GameObject @] @]
    [@B:Variables > Local Variables > Set Local Value:: Set [H:Setcurr_chara:H][V:Setcurr_chara:V] in [@B:-self-@] to [@B:Variables > Local Variables > Get Local GameObject:: [H:Getobj_female:H][V:Getobj_female:V] in [@B:-self-@] as GameObject @] [H:persistFalse:H]@]
[@C:Flow > Condition > Else:: Else @]
    [@B:Variables > Local Variables > Set Local Value:: Set [H:Setplr_gender:H][V:Setplr_gender:V] in [@B:-self-@] to [@B:Common > Values > Integer:: [H:Value0:H][V:Value0:V] @] [H:persistFalse:H]@]
    [@B:GUI > Screens (plyGame) > Set Text:: Set Text of [H:Set Text ofGenderLabel:H][V:Set Text ofGenderLabel:V] on [H:onPlayer Select:H][V:onPlayer Select:V] to [@B:Common > Values > String:: [H:Valuemale:H][V:Valuemale:V] @] @]
    [@B:Object > Object > EnDisable GameObject:: [H:StateDisable:H][V:StateDisable:V] [@B:Variables > Local Variables > Get Local GameObject:: [H:Getobj_female:H][V:Getobj_female:V] in [@B:-self-@] as GameObject @] @]
    [@B:Object > Object > EnDisable GameObject:: [H:StateEnable:H][V:StateEnable:V] [@B:Variables > Local Variables > Get Local GameObject:: [H:Getobj_male:H][V:Getobj_male:V] in [@B:-self-@] as GameObject @] @]
    [@B:Variables > Local Variables > Set Local Value:: Set [H:Setcurr_chara:H][V:Setcurr_chara:V] in [@B:-self-@] to [@B:Variables > Local Variables > Get Local GameObject:: [H:Getobj_male:H][V:Getobj_male:V] in [@B:-self-@] as GameObject @] [H:persistFalse:H]@]
[@C:  end  @]
Change Face

The character’s face is changed by changing the material used. The buttons will trigger the Event Change Face with param1 = -1 (left) and param1 = 1 (right).
I use -1 and +1 because the Global Variable plr_face will be decreased or increased. It is basically an index into the number of materials added to the Face Material Group of the Simple Customizer on the object.
The next Block will “clamp” the value between 0 and 4 since I only defined 5 face styles. This will prevent plr_face from going to a value smaller than 0 or higher than 4.
Then I update the number shown on the label, and finally tell the Simple Customizer to show the correct face material on the face. Notice how I am simply using the object pointed to by curr_chara. That is why I have to set this variable each time the gender is changed and also why I made sure the male and female has the exact same amount of face materials.
[@E:Common > Custom:: Change Face@]
[@B:Variables > Global Variables > Set Global Value:: Set [H:Setplr_face:H][V:Setplr_face:V] to [@B:Math > Common > Int: A + B:: [@B:Variables > Global Variables > Get Global Int:: [H:Getplr_face:H][V:Getplr_face:V] as Integer @] + [@B:Variables > Temp Variables > Get Temp Int:: [H:Getparam1:H][V:Getparam1:V] as Integer @] @] [H:persistFalse:H]@]
[@B:Variables > Global Variables > Set Global Value:: Set [H:Setplr_face:H][V:Setplr_face:V] to [@B:Math > MathF > Clamp (Int):: Clamp [@B:Variables > Global Variables > Get Global Int:: [H:Getplr_face:H][V:Getplr_face:V] as Integer @] between [@B:Common > Values > Integer:: [H:Value0:H][V:Value0:V] @] and [@B:Common > Values > Integer:: [H:Value4:H][V:Value4:V] @] @] [H:persistFalse:H]@]
[@B:GUI > Screens (plyGame) > Set Text:: Set Text of [H:Set Text ofFaceLabel:H][V:Set Text ofFaceLabel:V] on [H:onPlayer Select:H][V:onPlayer Select:V] to [@B:Variables > Global Variables > Get Global String:: [H:Getplr_face:H][V:Getplr_face:V] as String @] @]
[@B:Object > Customizer (plyRPG) > Change Material:: Change Material to [@B:Variables > Global Variables > Get Global Int:: [H:Getplr_face:H][V:Getplr_face:V] as Integer @] on [@B:Common > Values > String:: [H:ValueFace:H][V:ValueFace:V] @] of [@B:Variables > Local Variables > Get Local GameObject:: [H:Getcurr_chara:H][V:Getcurr_chara:V] in [@B:-self-@] as GameObject @] [H:Cache targetFalse:H]@]
Change Hair

Changing the hair style is pretty much the same, except here I will tell the simple customiser to update the object group. The buttons are triggering the event Change Hair with param1 = -1 (left) and param1 = 1 (right).
[@E:Common > Custom:: Change Hair@]
[@B:Variables > Global Variables > Set Global Value:: Set [H:Setplr_hair:H][V:Setplr_hair:V] to [@B:Math > Common > Int: A + B:: [@B:Variables > Global Variables > Get Global Int:: [H:Getplr_hair:H][V:Getplr_hair:V] as Integer @] + [@B:Variables > Temp Variables > Get Temp Int:: [H:Getparam1:H][V:Getparam1:V] as Integer @] @] [H:persistFalse:H]@]
[@B:Variables > Global Variables > Set Global Value:: Set [H:Setplr_hair:H][V:Setplr_hair:V] to [@B:Math > MathF > Clamp (Int):: Clamp [@B:Variables > Global Variables > Get Global Int:: [H:Getplr_hair:H][V:Getplr_hair:V] as Integer @] between [@B:Common > Values > Integer:: [H:Value0:H][V:Value0:V] @] and [@B:Common > Values > Integer:: [H:Value4:H][V:Value4:V] @] @] [H:persistFalse:H]@]
[@B:GUI > Screens (plyGame) > Set Text:: Set Text of [H:Set Text ofHairLabel:H][V:Set Text ofHairLabel:V] on [H:onPlayer Select:H][V:onPlayer Select:V] to [@B:Variables > Global Variables > Get Global String:: [H:Getplr_hair:H][V:Getplr_hair:V] as String @] @]
[@B:Object > Customizer (plyRPG) > Change Object:: Change Object to [@B:Variables > Global Variables > Get Global Int:: [H:Getplr_hair:H][V:Getplr_hair:V] as Integer @] on [@B:Common > Values > String:: [H:ValueHair:H][V:ValueHair:V] @] of [@B:Variables > Local Variables > Get Local GameObject:: [H:Getcurr_chara:H][V:Getcurr_chara:V] in [@B:-self-@] as GameObject @] [H:Cache targetFalse:H]@]
Change Colour

Again, similar to how hair and face styles work but this time I tell the customiser to update a colour group. The buttons are triggering the event Change Colour with param1 = -1 (left) and param1 = 1 (right). One difference is that I place the name of the selected colour on the label rather than showing a number, so the event is a bit longer.
[@E:Common > Custom:: Change Colour@]
[@B:Variables > Global Variables > Set Global Value:: Set [H:Setplr_col:H][V:Setplr_col:V] to [@B:Math > Common > Int: A + B:: [@B:Variables > Global Variables > Get Global Int:: [H:Getplr_col:H][V:Getplr_col:V] as Integer @] + [@B:Variables > Temp Variables > Get Temp Int:: [H:Getparam1:H][V:Getparam1:V] as Integer @] @] [H:persistFalse:H]@]
[@B:Variables > Global Variables > Set Global Value:: Set [H:Setplr_col:H][V:Setplr_col:V] to [@B:Math > MathF > Clamp (Int):: Clamp [@B:Variables > Global Variables > Get Global Int:: [H:Getplr_col:H][V:Getplr_col:V] as Integer @] between [@B:Common > Values > Integer:: [H:Value0:H][V:Value0:V] @] and [@B:Common > Values > Integer:: [H:Value5:H][V:Value5:V] @] @] [H:persistFalse:H]@]
[@B:Object > Customizer (plyRPG) > Change Color:: Change Color to [@B:Variables > Global Variables > Get Global Int:: [H:Getplr_col:H][V:Getplr_col:V] as Integer @] on [@B:Common > Values > String:: [H:ValueHair:H][V:ValueHair:V] @] of [@B:Variables > Local Variables > Get Local GameObject:: [H:Getcurr_chara:H][V:Getcurr_chara:V] in [@B:-self-@] as GameObject @] [H:Cache targetFalse:H]@]
[@C:Flow > Condition > If:: If [@B:Flow > Comparison > Int: a = b:: [@B:Variables > Global Variables > Get Global Int:: [H:Getplr_col:H][V:Getplr_col:V] as Integer @] = [@B:Common > Values > Integer:: [H:Value0:H][V:Value0:V] @] @] @]
    [@B:GUI > Screens (plyGame) > Set Text:: Set Text of [H:Set Text ofColourLabel:H][V:Set Text ofColourLabel:V] on [H:onPlayer Select:H][V:onPlayer Select:V] to [@B:Common > Values > String:: [H:Valuelight:H][V:Valuelight:V] @] @]
[@C:Flow > Condition > Else If:: Else If [@B:Flow > Comparison > Int: a = b:: [@B:Variables > Global Variables > Get Global Int:: [H:Getplr_col:H][V:Getplr_col:V] as Integer @] = [@B:Common > Values > Integer:: [H:Value1:H][V:Value1:V] @] @] @]
    [@B:GUI > Screens (plyGame) > Set Text:: Set Text of [H:Set Text ofColourLabel:H][V:Set Text ofColourLabel:V] on [H:onPlayer Select:H][V:onPlayer Select:V] to [@B:Common > Values > String:: [H:Valuedark:H][V:Valuedark:V] @] @]
[@C:Flow > Condition > Else If:: Else If [@B:Flow > Comparison > Int: a = b:: [@B:Variables > Global Variables > Get Global Int:: [H:Getplr_col:H][V:Getplr_col:V] as Integer @] = [@B:Common > Values > Integer:: [H:Value2:H][V:Value2:V] @] @] @]
    [@B:GUI > Screens (plyGame) > Set Text:: Set Text of [H:Set Text ofColourLabel:H][V:Set Text ofColourLabel:V] on [H:onPlayer Select:H][V:onPlayer Select:V] to [@B:Common > Values > String:: [H:Valuered:H][V:Valuered:V] @] @]
[@C:Flow > Condition > Else If:: Else If [@B:Flow > Comparison > Int: a = b:: [@B:Variables > Global Variables > Get Global Int:: [H:Getplr_col:H][V:Getplr_col:V] as Integer @] = [@B:Common > Values > Integer:: [H:Value3:H][V:Value3:V] @] @] @]
    [@B:GUI > Screens (plyGame) > Set Text:: Set Text of [H:Set Text ofColourLabel:H][V:Set Text ofColourLabel:V] on [H:onPlayer Select:H][V:onPlayer Select:V] to [@B:Common > Values > String:: [H:Valueblue:H][V:Valueblue:V] @] @]
[@C:Flow > Condition > Else If:: Else If [@B:Flow > Comparison > Int: a = b:: [@B:Variables > Global Variables > Get Global Int:: [H:Getplr_col:H][V:Getplr_col:V] as Integer @] = [@B:Common > Values > Integer:: [H:Value4:H][V:Value4:V] @] @] @]
    [@B:GUI > Screens (plyGame) > Set Text:: Set Text of [H:Set Text ofColourLabel:H][V:Set Text ofColourLabel:V] on [H:onPlayer Select:H][V:onPlayer Select:V] to [@B:Common > Values > String:: [H:Valuepink:H][V:Valuepink:V] @] @]
[@C:Flow > Condition > Else If:: Else If [@B:Flow > Comparison > Int: a = b:: [@B:Variables > Global Variables > Get Global Int:: [H:Getplr_col:H][V:Getplr_col:V] as Integer @] = [@B:Common > Values > Integer:: [H:Value5:H][V:Value5:V] @] @] @]
    [@B:GUI > Screens (plyGame) > Set Text:: Set Text of [H:Set Text ofColourLabel:H][V:Set Text ofColourLabel:V] on [H:onPlayer Select:H][V:onPlayer Select:V] to [@B:Common > Values > String:: [H:Valuegreen:H][V:Valuegreen:V] @] @]
[@C:  end  @]
Start Button
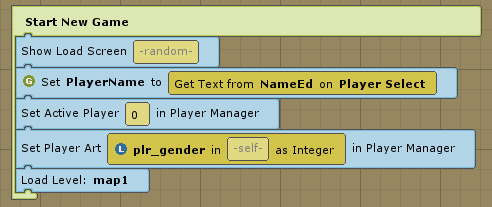
When the Start button is clicked the Start New Game Event is triggered. It will show a loading screen and update the PlayerName Global Variable with the name the player entered.
The Player Manager will be told that character (0) should be the active player. In my game I only have one player type so the first one (0) is always used. This will be a clearer when you look at the net section that explains how the Player Manager is set up. Next I tell the Player Manager what art of the selected character should be used.
Finally the first game map is loaded. The name used here will depend on what game maps you’ve created and what you named it.
[@E:Common > Custom:: Start New Game@]
[@B:GUI > Screens (plyGame) > Show Load Screen:: Show Load Screen [@B:-random-@] @]
[@B:Variables > Global Variables > Set Global Value:: Set [H:SetPlayerName:H][V:SetPlayerName:V] to [@B:GUI > Screens (plyGame) > Get Text:: Get Text from [H:Get Text fromNameEd:H][V:Get Text fromNameEd:V] on [H:onPlayer Select:H][V:onPlayer Select:V] @] [H:persistFalse:H]@]
[@B:Character > PlayerMan (plyRPG) > Set Player:: Set Active Player [@B:Common > Values > Integer:: [H:Value0:H][V:Value0:V] @] in Player Manager @]
[@B:Character > PlayerMan (plyRPG) > Set Player Art:: Set Player Art [@B:Variables > Local Variables > Get Local Int:: [H:Getplr_gender:H][V:Getplr_gender:V] in [@B:-self-@] as Integer @] in Player Manager @]
[@B:Flow > System > Load Level:: Load Level: [H:Load Level:map1:H][V:Load Level:map1:V] @]
Setting up the Player Manager
The Player Manager can be found under the Actors tab of the plyGame Main Editor.
 We will need a default player character for the Player Manager. See the previous guide on how to create such a default character. This is the character spawned when you use the Unity Play button. This is also the character you will use if you have only one player character in the game and do not allow the player to choose between different classes, genders, etc.
Note that it is also possible to specify that one of the characters in the list of defined character should be used for the ‘default’ character y entering for example (0) in the character idx field.
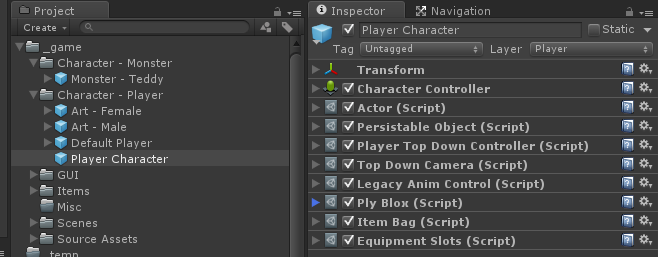
I’ve already create the male and female “Art” prefabs since I needed them in the player selection scene. Now I only need to create the player character prefab which carries the player controller, actor, and other player related components. This is basically the same as in the previous tutorial where I created a simple player character except this object will not have any child objects (art) in it since these are created separately and inserted by the Player Manager when needed.
Note that you may setup a character in the normal way where it includes the art if you do not intend on adding art to the player manager’s art list for a selected character.
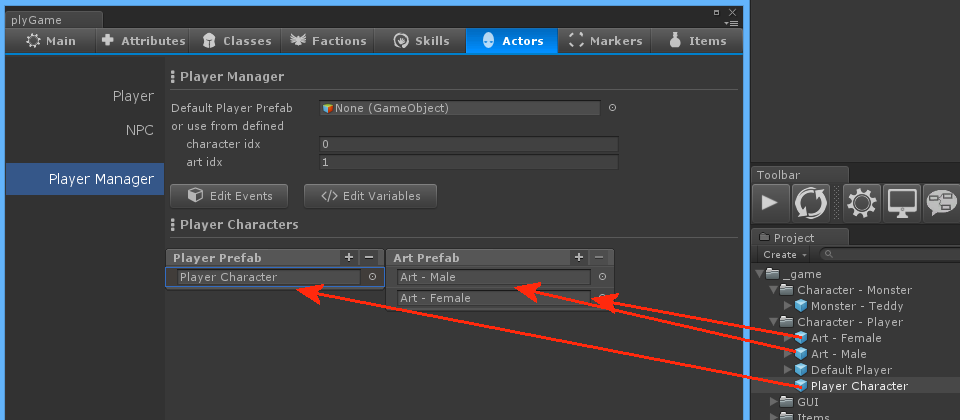 I now have the 3 prefabs needed to configure the Player Manager. The Player Character Prefab, Male Art, and Female Art.
In the player manager I will press the (+) to add a new entry in the Player Prefab list and drag-drop the player prefab there. Then click on this field to select it and make the Art list available. In the Art Prefab list I will add two entries and drag-drop the male art prefab into the first and the female into the second.
You will note I have not set a Default Player Prefab as I’ve configured the character idx and art idx fields to point to the 1st character and 2nd art (female). This will be used whenever I press the Unity Play button to quickly test a game map.
Spawn Player in Scene
 The Player Manager will not automatically spawn a player character after a scene is loaded since it would not know if it is a game map scene or not. You need to tell it when to spawn a player character.
This is very easy to do and you simply need to add the one Block to a start event of all your game map scenes. Remember that we already told the Player Manager what character and art to use when the start button was pressed? The game manager will remember these options when the game is saved.
So, in each game map you can add an empty GameObject that has a plyBlox Component on it and in this Blox you add Events like this.
In the On Start Event I will ask the Player Manager to spawn the player. I do this here because this is the first Event that will trigger after the scene is done loading.
[@E:Common > On Start:: On Start@]
[@B:Character > PlayerMan (plyRPG) > Spawn Player:: Spawn Player at [@B:-0x0x0-@] with ident [@B:player@] @]
Then in the On State Enter Event I will hide the loading screen, if any is visible. This event normally trigger second after a scene is done loading so by now the player should also be visible in the scene.
[@E:Common > On State Enter:: On State Enter@]
[@B:GUI > Screens (plyGame) > Hide All Screens:: Hide All Screens @]
 The
The Spawn Player Block takes a field with which you can specify where in the scene the player should spawn. By default this is position 0x0x0 in the world but you would not normally want this. The easiest way to specify a different location is to add a Marker to the scene and then get the position of that marker when the event runs.
Add a marker from menu: GameObject > Create Other > plyRPG ? Location Marker. A new marker object will be added to the scene. You can now move this where you want the player to be spawned when he enters the scene. Note the small cube at the bottom of the marker, this should be above the terrain/ floor. If this cube is under the terrain then your character will spawn inside the floor and start falling through it.
To use this marker I could change the Block to this by simply drag-dropping the marker object from the Hierarchy view onto the field of the block (note the field takes a GameObject as value, not a Vector3 position).
[@B:Character > PlayerMan (plyRPG) > Spawn Player:: Spawn Player at [@B:Common > Values > GameObject:: [H:ValueMarker 1 (GameObject):H][V:ValueMarker 1 (GameObject):V] @] with ident [@B:player@] @]