Make RPG: Simple Game Level and Player
Now that we have the menu screen sorted out it is time to create a test level to load and player character that can run around in it. This guide is to give you some general knowledge concerning character setup and game maps/ levels. You do not have to implement anything discussed here, except for the player setup part where we will be creating the default player needed for the next guide.
Add Game Level
 If you have been following the previous guides you would note that the Blocks where going to load a character selection screen. Let’s change that for now to test the game level and the player character that will be created in it.
Game levels are basically just Unity scenes. The only requirement from the plyGame side is that the scene should be listed in the build settings.
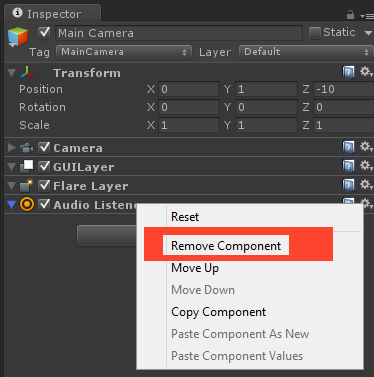
Create a new scene, menu: File > New Scene. If you remember from a previous guide, the scene will have a default Camera object that has an Audio Listener component on it. Remove this component now if you did not change the plyGame Sound Settings to not create a default audio listener. To remove a component you simply right-click on it and choose to remove. Save the scene, I named mine test_map.
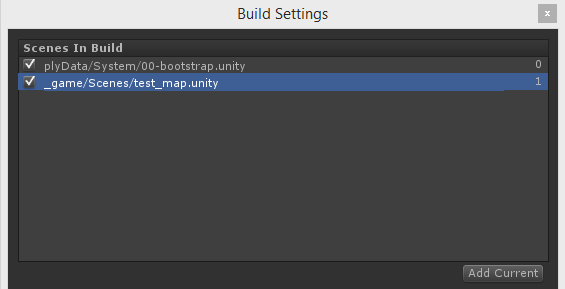
Now the scene should be added to the build settings. Open build settings, menu: File > Build Settings. You can either drag and drop the scene from the Project panel into the list Scenes in Build, or click on the add current button since the scene is currently open.
You will also notice that I have the 00-bootstrap scene in the list. This is the plyGame main scene and should always appear first in this list. If you do not have this scene in your list then use the plyGame refresh to update your build settings. This can be done via menu: Tools > PLYoung > plyGame > Quick Refresh (be sure to close the build settings window first before doing this else the list might not be updated).
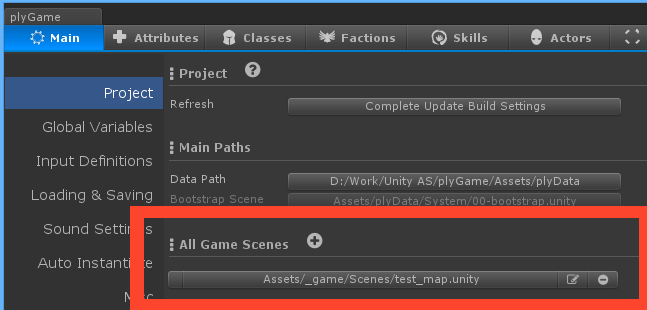
The game levels can also be viewed and added via the plyGame Main Editor under Main > Project.
Loading the Level
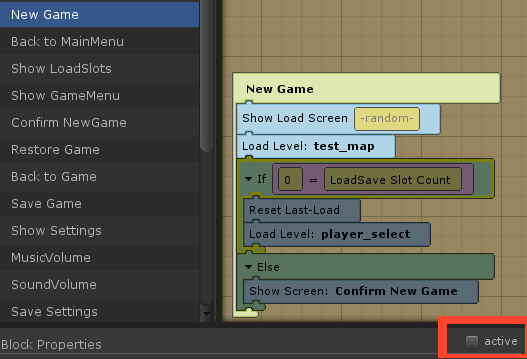 Now I need to make the change in the Blocks so that this test level will be loaded. Note that the next guide will cover how you do a character selection screen and then I will change it back to load the character selection scene and not this test map.
 Recall that the
 new game button triggers the Event New Game, so this will be a good spot to load the test map. I will simply insert the Load Level block at the top and deactivate the other Blocks rather than removing them. I will also show a loading screen. Deactivated Blocks will not execute when the Event is triggered. You toggle the Block’s active state via the active toggle in the Block’s properties. Remember, this is just a temporary solution to quickly test what happens when a game map is loaded.
If you now press the plyGame Play button and run through the game menu and use new game the map will be loaded but you will note that the loading screen does not go away. This happens because plyGame can’t predict when you are done loading scenes or why you displayed the loading screen in the first place. This is easy to fix though and normally you will do the following in all your game maps.
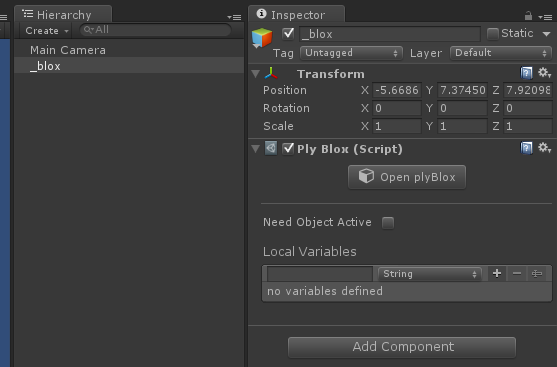 I like to create, in each game map/ scene, a
 scene blox which handles all kinds of events related to the scene. Create an empty Game Object in the scene scene, menu: GameObject > Create Empty. I normally rename this object to _blox so I can identify it quickly (you can name it anything you like). Now add a plyBlox component on it, menu: Component > plyGame > plyBlox. In the inspector of the _blox object, click Open plyBlox to edit the Blox of this object. This is where we will add the Event that will get rid of the loading screen.
Add a Common > On State Enter Event. This is the perfect place to do this because this Event will only trigger after the scene has finished loading. Add a Hide all Screen Block. This block will hide all visible Screens, so it will get rid of the active loading screen. If you designed a HUD Screen then this would be a good spot to show that now.
[@E:Common > On State Enter:: On State Enter@]
[@B:GUI > Screens (plyGame) > Hide All Screens:: Hide All Screens @]
Floor
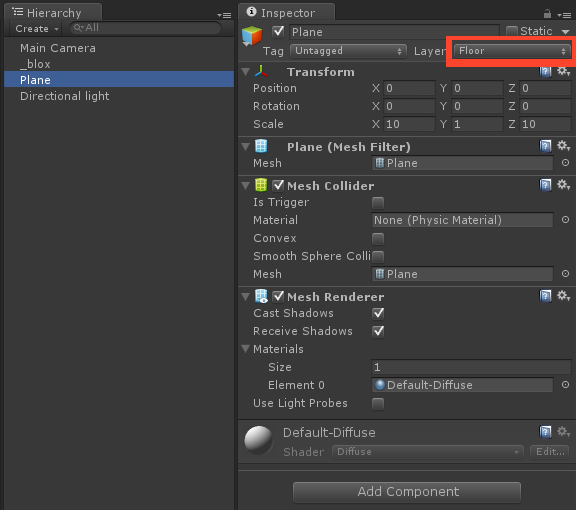 The scene will need a floor for the player to walk on. I’ll add a simple plane, menu:
 GameObject > Create Other > Plane. I’ll make sure the position is at 0x0x0 and make it a bit bigger. You might also want to add a Directional Light to the scene now.
It is important that you set all objects that are floors to be in the Floor layer, especially when using a top-down player controller that has click-to-move support. If the floors are not in the correct layer then click-to-move will not work correctly. If you do not see a Floor layer then use the plyGame Quick Refresh to update the layers.
You could also use a Unity Terrain for your floor but remember to place it on the Floor layer.
Default Player
Now that we have a scene where the player can walk on I will create the player character in the scene. This method, of leaving the player character in the scene, is not the way you will normally do it but is quick and easy to test. You will normally make the player character into a prefab and then use the Player Manager to load the character into scenes (covered in next guide).
Create empty GameObject in the scene, menu: GameObject > Create Empty. It will be a good idea to position this at 0x0x0 now. I will rename the object to Default Player.
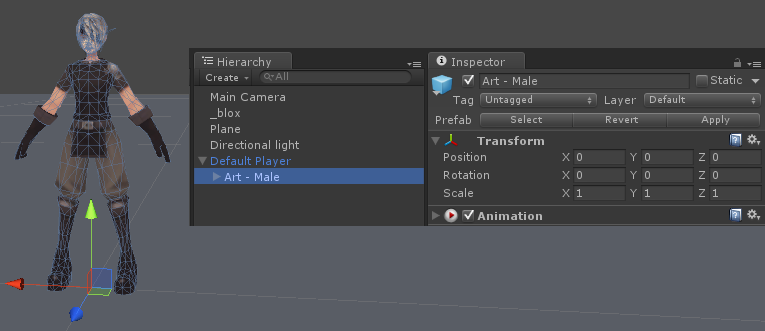 Drag your character model into the new game object so that is a child object of it. I like to rename this model to
 art, in this case art - male. make sure the art is positioned correctly so that the character’s feet is at the parent object’s pivot (or on the floor if you positioned the floor and the parent object correctly at 0x0x0 before).
The character must be rotated such that it faces down the Z axis of the parent object’s pivot. That would be the forward vie of the character. Click on the parent object, the one named Default Player and look at what direction the Blue arrow is showing in. This is the direction the character should face, so if it is wrong, rotate the character correctly. Note that the character object’s own blue arrow might face in different direction, you are only concerned with the model as a whole facing in the direction of the parent object’s blue arrow.
Click on the parent object, mine is the one called Default Player. This is the object onto which the character components are placed, not on the model (art) object.
now you need to decide what kind of character you are creating as there are different controllers depending on how the character will be controlled and how it should move. You can have a look at the documentation to learn more about the different controllers and all their settings.
 In my game I will make use of the top-down controller, so I will add this now, menu:
 Component > plyGame > Character > Player > Top-Down Controller. I also need to add a camera to the player character (note that not all camera controllers will work like this so read the documentation about your selected controller to learn where it should go), menu: Component > plyGame > Camera > Top-Down Camera.
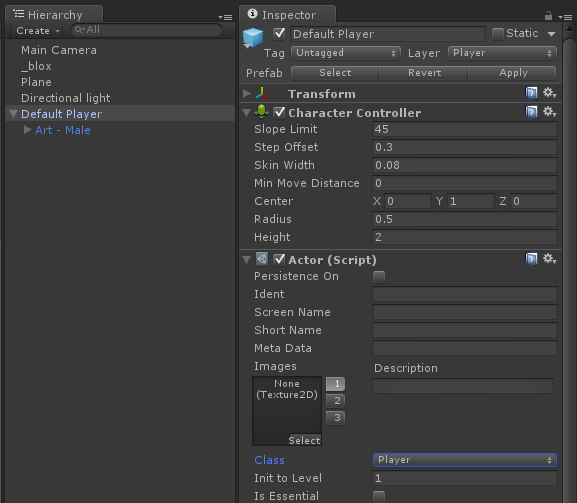
The player controller automatically added other needed components like the Actor and Character Controller. You can have a look at the plyGame and unity docs on how these can be configured and fine tuned. Important in the Actor is to select an Actor Class, else you will get error messages. Open the plyGaem Main Editor Tools > PLYoung > plyGame > Main Editor and go to the Classes tab. Click the (+) to create a new class and name is Player (we will look at this in more detail later). Go back to the Default Player object’s Actor component and select this new class next to Class property.
 The
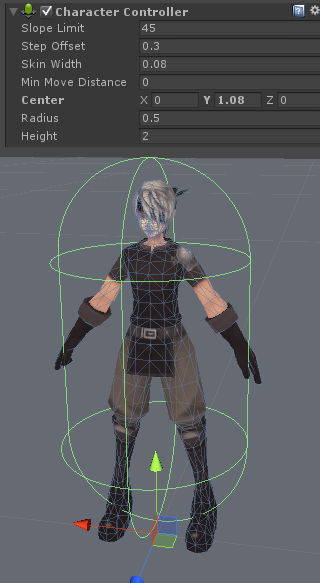
The Character Controller also needs to be fixed, by default the center is at 0x0x0 but that is wrong as the collider (green capsule) will extend below the character’s feet. The bottom needs to be at bottom of feed, perhaps even a bit higher depending on the Skin Width settings. Change the Y value of center, normally somewhere around 1 since height is 2.
You can now press the Unity play button (or the plyGame Play button) to test the level and move the player character around. At this point you will run into two problems, 1) the character is not moving, and 2) the character is not animating.
Assuming you’ve set the floor (ground) to be i the Floor layer you might also need to reset the plyGame input settings to its defaults. Open the plyGame Main Editor and go to Main > Input Definitions. Click on Setup Input Manager to auto-configure the Unity input settings and Reset to Defaults to get the default input binds.
 For animation we will need an animation controller on the character object. Here you have two choices (with the RPG module), the
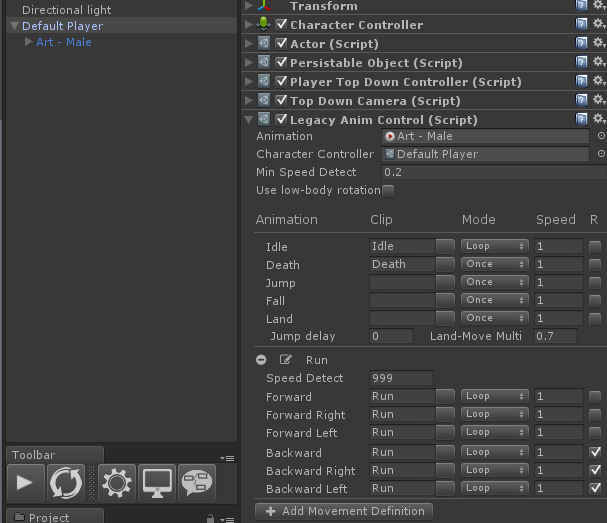
 legacy animation controller and basic mecanim controller. My game will make use of Unity’s legacy animation system so I will add the controller, menu: Component > plyGame > Character > Animation > LegacyAnim Control. Have a look at the documentation to learn more about the controllers and the available settings.
The controller should automatically pick up on the child object (model’s) Animation component, if it does not then your model either do not have animations or is set up to use mecanim.
I’ll select the name of the idle and death animation but leave the jump related animation empty since I’ve set my character to not be able to jump (in player controller component). I’ve removes the default walk group as I only want to test my character as running, for now. For run I use the same animation clip for all states, forward, back, left and right. I’ll tick the last toggle R for the backward movement so that the run clip is played in reverse when the character moves backwards.
The movement definitions like walk and run works by checking the value you enter in speed detect to determine which on of the animations to play. If I created a walk definition and set speed detect = 4 then walk will be played when the character is moving but at a speed of lower than 4. If it moves higher than 4 then run will be used. I set run to a high value (999) so that it is the one that will be played as a last resort when the character moves faster than any other definition’s speed setting.
But in my case the character always plays the run animation since there is ony one move definition defined, run.
If you press play now you should be able to move the character around the test map and see it play its idle and movement animations.